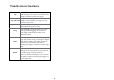
U683CL User Manual Conventions used in this guide In this user guide, we use the following symbols to indicate useful and important information: NOTE NOTE Notes, usage tips, or additional information Warning Caution Situations that could cause injury to yourself or others Situations that could cause damage to yourdevice or other equipment
Account Setting ................................................................... 24 Messaging.................................................................................... 25 About Messaging ................................................................ 25 Sending Messages ............................................................... 25 Reading Messages............................................................... 26 Receiving Emergency Alerts Messages ...........................
Important health information and safety precautionsError! Bookmark not defined. Regulatory agency identificationsError! Bookmark not defined. HEARING AID COMPATIBILITY HAC FOR WIRELESS TELECOMMUNICATIONS DEVICESError! Bookmark not defined.
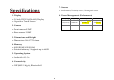
7. Sensors Specifications • Accelerometer, Proximity sensor, Geomagnetic sensor 8. Power Management (Performance) 1. Display Battery Type Capacity LithiumIon(Li-ion) 2000mAh • 5.0 inch FWVGA(854×480) Display • Capacitive Touch Screen 2. Camera • Front camera:0.3MP • Rear camera: 2.0MP 3. Dimensions and Weight • Dimensions: 146.9*73*9.6mm 4. Memory • 8GB (ROM)/1GB (RAM) • External memory : Supports up to 64GB 5. Operating System • AndroidTM 8.1 Go 6. Connectivity • WIFI(802.11 b/g/n), Bluetooth4.
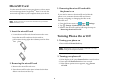
Basics In Box Battery The U683CL comes with the following items included in the box: Note that browsing the web frequently, extended data usage, being in a poor signal area, or subjecting the device to extreme temperatures will cause the battery to discharge quicker than normal. To increase battery life, limit your data usage, or turn off GPS and Bluetooth when not required. 1. Mobile phone 2. Micro USB cable 3. Battery cover 4. Battery 5. USB power adapter 6 .
MicroSD Card 3. Removing the microSD card while the phone is on Use the microSD card to store your photos, videos, music and certain apps from Google PlayTM Store. You can also move and copy files to your computer from your device. If you need to remove the microSD card while the phone is on, unmount the microSD card first to prevent corrupting or damaging the files in the microSD card. When you insert or remove the microSD card, you should remove the battery cover. NOTE 1.
Touchscreen Gestures To select onscreen items such as application and settings icons or press onscreen buttons, simply touch them with your finger. To open available options for the item, Tap and hold simply touch and hold your finger on the screen over the item. Swipe or slide Quickly drag your finger vertically or horizontally across the screen. Tap Drag Flick Rotate Tap and hold your finger before you start to drag.
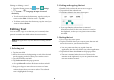
•Tap 3 while you type. When you release the key, the lowercase letters reappear. •Turn caps lock on. double-tap or touch & hold •Tap 3, so it changes to . Touch shift key again to return to lowercase. • Tap 1 you can to delete words, tap 4 you can change to the number and sign keyboard. Using the Onscreen Keyboard You can enter text using the onscreen keyboard. Some applications open the keyboard automatically. In others, tap anywhere in a text field to open the keyboard. 1.
Editing or deleting a word 1. From the Home screen, tap System > 2. dictionary. 2. Cutting and copying the text Apps > 1. Double-click to select the text to cut or copy it. 2. Tap and hold the selected text. 3. Tap Cut or Copy in the menu that opens. Settings. Language & input >Personal • To edit words from the dictionary, tap the word you want to edit >Edit > Edit the word > Tap OK. • To delete words from the dictionary, tap the word you want to delete >Delete.
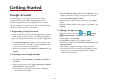
Getting Started 3. Select Security question and enter the Answer, which will be needed if you forget your password and then enter a Secondary Email >Create. 4. Read through Google Terms of Service > Tap I agree, Next. 5. Enter the letters shown on the screen > Tap Next > Tap Finish.
1. Home screen customization options Getting to Know the Home Screen Open the Home screen you want to customize. 2. Moving an item on the Home screen 1. The Home screen is displayed when the device is in idle mode. You can add your favorite apps, shortcuts, folders and widgets to the Home screen so they’re only a tap away. 2. Press 1. From the Home screen, tap and hold the item you want to move until it vibrates. Don’t lift your finger. 2. Drag the item to a new location on the Home screen. 3.
2. Notification icons Essential Display Icons Notification icons in the Status bar alert you to items that may require your attention such as new messages, calendar event reminders, missed call notifications, etc. Here’s what each one means: 1. Status icons You can tell a lot about your phone when you understand the icons in the Status bar.
2. Closing the Notifications panel Notifications Panel Drag the bottom bar of the panel up. Or just press Back. When you receive a new notification, an icon will be displayed in your status bar at the top of your screen. Opening & Switching Between Applications 1. Viewing and responding to Notifications 1. Tap and hold Status bar, and then slide your finger downward to open the Notifications panel. 1. Opening and closing the Applications List 1. From the Home screen, tap 2.
screen or enter the PIN or password to access the phone software. 2. Tap an icon to open the application or press to return to your previous screen. Back 4. Activating Secure Screen Lock Sleep Mode 1. From the Home screen, tap Sleep mode saves battery power by turning off your display. You will still receive messages and calls when the display is turned off. Your phone automatically turns off the display after a period of inactivity.
Adjusting Volume 2. Tap Ringtone and Media volume are independent of each other and adjusted separately. 3. Drag the volume sliders left or right to adjust your phone’s Ringtone, Media, and Alarm. Your phone plays a sample tone at the selected volume level while you drag the slider. Back or Home. 4. When you’re done, tap 1. Adjusting the ringer volume From the Home screen, press Volume up or Volume down on the right side of the phone to adjust the ringer volume to your desired level.
Connecting Your Phone to a Computer 7. After you have un-mounted the removable drive, you can disconnect the phone from the computer. 1. Copying files to/from the microSD card You can copy your music, photos, and other files to the microSD card of your phone. NOTE This option is available only when a microSD card is inserted into the slot of your phone. While your phone is connected to a computer, USB Mass storage mode prevents you from using applications that access the memory card. 1.
Phone Calls Making Calls • Add wait: Your phone will wait with the message, ‘Send the following tone?’ until Send is tapped, then continue dialing the remaining numbers. The simplest way to make a call is to dial the number directly. You can also call numbers listed in your call log or Contacts list. 3. Making an international call 1. Making a call from the dialer screen 1. From the Home screen, tap Phone. 2. Tap and hold 0 until the international prefix ‘+’ appears. 3.
in Contacts). When you receive a phone call from a phone number not stored in your Contacts, only the default caller ID icon and phone number are shown. • To find a specific contact, you can search by tapping Search. Enter the name of the contact you’re searching for. As you type, contacts with matching names appear below the search box. Or you can use the tab on the right hand side of the screen to scroll through the alphabetical contacts. 3. Tap the contact you want to call. 4.
2. Checking missed calls NOTE • If you miss a call, is displayed in the Status bar. • If you open the Notifications panel, you will see the number of missed calls. Tap the notification to be taken to the call log and view detailed information. To avoid damaging your hearing, do not hold the phone up to your ear when the speakerphone is on. Using Call Log Using In-Call Options The phone stores the numbers of all incoming and outgoing calls in the Call log.
4. Sending a text message from the Call log 1. From the Home screen, tap Phone > 2. Tap the contact > Send text message. 3. Enter your message and tap Call log. to Send. 5. Clearing the Call log 1. From the Home screen, tap 2. Tap Option >Call log>Tap Phone > Call log. >Clear call log >OK. • To remove just one entry from the Call log, tap the entry. In the pop up options, tap Call details >click Delete icon>OK. Listening to Your Voicemail 2. Calling a number from the Call log 1.
• If you have a Bluetooth headset that supports “voice-recognition” or “voice-dialing,” you may be able to open Voice Search by pressing and holding your headset’s main button and dial by voice using your headset. For details, see your headset manual. 2. Say the name of the contact you want to call Using Voice Dialer You can use the Voice Search application or Voice Dialer application to place a phone call by speaking the name of a contact or a phone number. 1. From the Home screen, tap contacts.
Contacts • Enter your contact’s information. 4. Tap Done. About contacts Contacts give you quick and easy access to the people you want to reach. Contacts from Google accounts are also downloaded and synced with the Contact list. Saving a phone number from the Dial Pad 1. From the Home screen, tap Phone. Create new contact. 2. Enter the number >Tap 3. Enter the information for the contact>tap Done.
Exporting contacts to your microSD card 1. From the Home screen, tap Apps > contacts. Option >Import/Export. 2. Tap 3. Tap Export to .vcf file. 4. Select contacts, tap OK to confirm. • This process creates a file containing all your selected contacts with a .vcf extension on your microSD card. Sharing visible contacts 1. From the Home screen, tap 2. Tap 4. Search for a contact Apps > contacts. 1. From the Home screen, tap Apps > contacts. 2. Tap Search. 3. Start entering the contact’s name.
Editing/Deleting Contacts 1. From the Home screen, tap Apps > 2. Tap the contact you want to edit >Tap 3. Edit the contact information. 4. Tap Done. Apps > contacts. Edit contact. 1. From the Home screen, tap 2. Tap the desired contact> Tap 1. Editing contact details 3. Tap contacts. Edit contact. Option >Set ringtone. • Tap a ringtone from the list to play when the contact calls. A sample of the ringtone is played. 4. Tap OK. 2. Setting a contact’s default phone number/email 4.
locations. This address book will be used throughout the user interface. • If you register two or more accounts, you can merge address books from the multiple accounts into one address book. Communicating 1. Sending text message 1. From the Home screen, tap Apps > contacts. 2. Tap and hold the contact you want to send >tap . • The Primary Phone Number is used, or you are prompted to choose a phone number. 2. Contact List Display and SettingsOptions 1. From the Home screen, tap 1.
Messaging 3. Enter the phone number in the To field. Fill in one or more recipients. You can: • Enter the first few letters of a contact name or phone number. Matching contacts are displayed. Continue typing or tap a name or phone number from the search results. • Tap > Select message recipients from your contact list >Ok. 4. Tap Type message >enter your message. • Tap Menu to see more options.
3. When you finish editing, tap Send. 2. Sending a multimedia message (MMS) To compose a multimedia message, start by creating a new text message. Then simply add an attachment. 1. From the Home screen, tap Apps > Reading Messages Messaging. 1. From the Home screen, tap Apps > Messaging. 2. Tap a message thread. 3. Tap and hold an individual message to see more options. 2. Tap Create New message. 3. Enter the phone number in the To field. Or select recipients from the contact list. 4.
2. Tap Search to search. 3. Enter the search term >tap 1. Receiving Emergency Alerts Messages Search. 1. From the Home screen, tap Apps > Messaging. 2. Tap Emergency alerts message you want to view. Emergency alert messages are indicated with Emergency alert icon. • If Emergency alert arrives on your phone during a call, is displayed in the Status bar. If Presidential Emergency Alert, emergency alert icon will flashes. If non-Presidential, Emergency alert icon is static icon.
MMS Validity period Changing Messaging Settings 1. From the Home screen, tap 2. Tap Apps > Messaging. Option >Settings. Set MMS Validity period to Maximum or Two days 3. Notification settings 1. Storage settings Delete old messages Sound Check to delete older messages in a thread when messaging memory or thread limits are reached. Uncheck to keep all messages. You may need to manually delete messages if the messaging memory limit is reached.
send the email to several recipients, Google Go separate each email address with a comma. 4. Enter a subject in the Subject field. Gmail 5. Type the message text in the Compose Mail field. • To attach an image file, Tap Attach file>select the picture you want to attach. 1. Opening your Inbox and Reading your Gmail 6. Tap • To save the message as a draft, tap draft. The inbox is your default Gmail view. All your received emails are delivered to your inbox. 1. From the Home screen, tap Apps > 2.
viewed on a computer. (Note: Custom label colors created on the web are not supported on your phone). Labeling an email NOTE Settings > Security & location > Location services. Select one or both from Use wireless networks or Use GPS satellites. Maps may not be available for all locations. 1. From the Home screen, tap Apps > Gmail. 2. When reading a message, tap >Change labels. 3. Select a label > tap OK. 6. Viewing emails by label 1. Opening and viewing Maps 1. From the Home screen, tap Apps > Gmail.
1. While viewing detail information for a location, • Tap to star the location. • Tap to un-star the location. 4. Viewing map layers Initially, Google Maps opens with a street map. You can view additional map layers, such as satellite images and traffic information. You can also view custom Web created Google Maps. Viewing a location in Street view Street view mode provides a street-level view of the location. Street view may not be available for all areas. 1. From the Home screen, tap Apps > Maps.
4. Tap Done. 1. Opening Calendar 1. From the Home screen, tap Apps > Calendar. 3. Viewing calendar and events Events are color coded to enable you to distinguish between multiple calendars. Events times are shown using your local time zone, which is provided by your active mobile network. When traveling, you may want to set a home time zone in Calendar. Changing calendar view When you open Calendar, Month view is shown by default. You can also view the Calendar by Agenda, Day, or Week. 1.
4. Editing or deleting an event Check if you don’t want to see Hide declined events to which you’ve declined events invitations. Calendar Displays calendars and event view Use home time times in your home time zone setting zone when traveling. Home time zone If Use home time zone is checked, you can set home time zone. Week number setting Display week number First week of year Set alerts & notifications Reminder settings 1. In event details view, press the event > Edit event to edit the event. 2.
3.Viewing details about an application 1. While browsing Google Play Store, or in a list of search results, tap an application to view more details. Application details screens include a description, ratings, and specific information about the application. The Comments tab includes comments from people who have used the application. You can download and install an application from this screen. Google Play Store 2.
2. Creating a Google Checkout account You must have a Google Checkout account to purchase items from Google Play Store. You can set up a Checkout account with your first purchase from Google Play Store. 2. Tap Option > My Apps > tap the application to update. 3. Tap Update >Accept & download. 4. Tap the explanation that best matches why you’re Back. installing > tap Open or press The application is installed. You can uninstall the application again at any time.
3. Using Browser options 1. Stopping page loading While webpage is loading, tap field. on the left of the URL 2. the current page Web Tap Search for information or browse web pages using the Chrome. To access the internet, you must have an active data or Wi-Fi connection. 1. While viewing any web pages, tap Option >Find in page. 2. Enter the search term. • As you type, matching characters will be highlighted. Tap ∧or ∨to scroll to the previous or next matching term. 1. Opening Chrome Apps > Refresh.
• If you prefer to open the webpages in a new window, tap and hold the bookmark and tap Open in new tab. 1. Navigating between webpages • Press Back to return to the previous web pages. Or tap Option >Forward if you pressed by accident. Back 3. Editing a bookmark 1. From any webpages, tap 2. Tap on the right of the bookmark to edit >Edit. 3. Edit the name and/or location >tap OK. 2. Switching between Browser windows 1. From any web pages, tap Option >Bookmarks >tap HISTORY . 2.
2. Tap a video to begin playback. • Tap the video to pause or resume playback. • Tap Info, Related videos or Comments to learn more about the video. • Rotate your phone to watch the video in fullscreen view. You can also double-tap the video to toggle full-screen view on and off. You can discover and watch YouTube videos without a YouTube account, but if you want to take advantage of many YouTube features, you must sign into your YouTube account. 1. From the Home screen, tap Apps > YouTube. 2.
1. From the Home screen, tap 2. Tap a video to play. Apps > YouTube. 3. Tap Share. 4. Tap the application you want to use to share the video. Search settings SafeSearch filtering 6. YouTube settings You can change the following settings for YouTube on your phone. 1. From the Home screen, tap Apps > YouTube. 2. Tap General settings Preload subscriptions Option>Settings. Preloading Check if you prefer to watch videos in high resolution by default when connected to High quality on mobile networks.
3. Checking wireless network status Wi-Fi 1. From the Home screen, tap Apps > Settings. 2. Tap Wi-Fi. 3. Tap the wireless network that the phone is currently connected to. 1. Turning Wi-Fi on and connecting to a wireless network 1. From the Home screen, tap Apps > Settings. Wireless & Internt>Wi-Fi. 2. Tap 3. Select the Wi-Fi check box to turn Wi-Fi on. 4. The network names and security settings of detected Wi-Fi networks are displayed. 5. Tap a Wi-Fi network to connect.
1. From the Home screen, tap Apps > Disconnecting or Un-pairing from a Bluetooth Device Settings> Connected devices. 2. Tap Bluetooth. 3. If Bluetooth isn’t turned on, check Bluetooth to turn it on. 4. Tap Device name, enter the name for your phone in the dialog box > RENAME. 1. Disconnecting or Un-pairing a Bluetooth device 1. From the Home screen, tap Apps > Settings> 3. In the paired devices section, tap the side of the device to disconnect. 4. Tap Forget. Connected devices. 2.
1. Put the Bluetooth device in pairing mode. 2. From the Home screen, tap Apps > Settings> 1. Sending information from another device Connected devices. 3. Tap Bluetooth. 4. If Bluetooth isn’t turned on, check Bluetooth to turn it on. 5. Tap the device’s name in the Paired devices section. 6. If prompted to enter a passcode, try 0000 or 1234, or consult the headset documentation to find the passcode. 1. On your phone, open the application that contains the item you want to send. 2.
6. If a Bluetooth authorization request is displayed on your phone, enter the same passcode on both your phone and the other device, or confirm the autogenerated passcode. 7. When your phone receives a file transfer request notification, slide down the notifications panel, and then tap Accept. 8. When the transfer is complete, a notification is displayed. To open the file immediately, slide down the notifications panel, and tap the notification.
Entertainment GPS location Camera/Camcorder White balance You can take pictures and shoot videos with Camera/Camcorder. Photos and videos captured with the camera will be stored on the internal memory. Incandescent, Daylight, Fluorescent, Cloudy. 3. Taking a picture 1. From the Home screen, tap Apps > 2. Frame your subject on screen. 2. Camera settings When in Camera mode, Camera settings are displayed on screen.
adjust your camcorder settings or leave them in automatic mode. Sound Recorder 1. Opening Sound Recorder. Tap Option. The settings open over the screen. • Tap screen to close the settings menus Tap the setting you want to change. 1. From the Home screen, tap Recorder. 2. Tap Flash Video quality General settings White balance Storage NOTE On, Off HD 720p, SD 480p, CIF, QVGA, QCIF Incandescent, Daylight, Cloudy. Sound to start recording a voice clip. 3. Tap to stop recording.
Tools 2. Editing an alarm 1. From the Home screen, tap Clock Clock. 2. Tap > Tap an existing alarm. 3. Turn the alarm on or off by checking or unchecking the checkbox, ‘Turn alarm on’. In the alarm list, set alarms are underlined in green. 4. Edit Time, Repeat, Ringtone, Vibrate and Label >Done. Or tap Delete to remove the alarm >OK. 1. Opening the Clock 1. From the Home screen, tap Apps > Clock. • The Clock application opens and displays the date, time and other useful information.
Calculator Using Calculator 1. From the Home screen, tap Apps > Calculator. 2. Enter numbers and arithmetic operators. • Slide from the panel to left to open Advanced panel. • Tap and hold the Calculator’s display to open a text editing menu. You can cut, copy, and select text for use in Calculator or other Applications. • Tap Clear history to delete the last number or operator you entered. Tap and hold DEL to delete everything in the display.
Settings Settings on Your Phone Connected devices Bluetooth Bluetooth On / Off. For details about working with these settings, see “Bluetooth”. Control and customize phone settings on the Settings screen. 1. From the Home screen, tap Settings. Apps > Cast Printing Network and Internet Wi-Fi Mobile network USB Wi-Fi On / Off. Set up and manage Wi-Fi networks. For details about working with these settings, see “Wi-Fi”.
Battery Sound Tap Battery you can see how much the apps using the battery and the all battery. Volume Also vibrate Set whether vibrate when calls for calls Phone Select the ringtone to sound when you ringtone receive a phone call. Display Brightness level Night Light Adaptive brightness Adjusting the brightness of the screen.
Storage Users & accounts Storage manager, you can see the SD card and the phone space. Unmount SD card Format SD card Mount SD card You can add an account for Duo Preview, Exchange, Google, IMAP and POP3. Unmout the SD card so you can safely remove it. Erases all data on the SD card, such as music and photos. Add SD card. Accessibility When talkback is on, your device provides spoken feedback to help blind and low-vision users. For example, it describes what you touch, select, and activate.
Google System update You can set google services related settings, such as Ads, Backup, Cast media controls … 1. Make sure the target device is power on with a fully charged battery. 2. Tap to go to Settings> About phone and tap System update. System Language Select the language and keyboard to use for the text & input on your phone. Gesture Date & time Backup Reset options About phone Set to press the power button twice to jump to camera. Set data, time and the format for displaying date.
otherwise, related to the Accessed Information, including without limitation any express or implied Safety and use Please read before proceeding representation or warranty of merchantability, fitness for a particular purpose, non-infringement, quality, accuracy, completeness, effectiveness, reliability, or usefulness.
connecting this product to the computer. The power supply cord of a desktop or notebook computer has an equipment grounding conductor and a grounding plug. The plug must be plugged into an appropriate outlet which is properly installed and grounded in accordance with all local codes and ordinances. LIABILITY OF UNIMAX COMMUNICATIONS MOBILE OR ITS AFFILIATES EXCEED THE AMOUNT RECEIVED FROM YOU, REGARDLESS OF THE LEGAL THEORY UNDER WHICH THE CAUSE OF ACTION IS BROUGHT.
above 140°F (60°C), or dispose of in fire or water. Replace only with specified batteries. Recycle or dispose of used batteries according to the local regulations or reference guide supplied with your product. • Always keep the battery out of the reach of babies and small children, to avoid swallowing of the battery. Consult the doctor immediately if the battery is swallowed. • Only use the battery with a charging system that has been qualified with the system per this standard, IEEE-Std-172 5-2006.
chemicals or particles, such as grain, dust, or metal powders. Please be aware that sparks in such areas could cause an explosion or fire resulting in bodily injury or even death. 4. Safety precautions for direct sunlight Keep this product away from excessive moisture and extreme temperatures.
human body be allowed to come too close to the antenna during operation of the equipment. Use only the supplied integral antenna. Use of unauthorized or modified antennas may impair call quality and damage the phone, causing loss of performance and SAR levels exceeding the recommended limits as well as result in noncompliance with local regulatory requirements in your country.
Service needed on components inside the device should be done by an authorized service technician or provider. Protect your phone • Always treat your phone and its accessories with care and keep them in a clean and dust-free place. Faulty and damaged products • Do not attempt to disassemble the phone or its accessory. • Only qualified personnel must service or repair the phone or its accessory. • Do not expose your phone or its accessories to open flames or lit tobacco products. 14.
Air bags Do not place a phone in the area over an air bag or in the air bag deployment area. Store the phone safely before driving your vehicle. Mounting accessories Do not use the product on an unstable table, cart, stand, tripod, or bracket. Any mounting of the product should follow the manufacturer’s instructions, and should use a mounting accessory recommended by the manufacturer. Avoid unstable mounting Do not place the product with an unstable base.
To minimize the risk of RSI, when Texting or playing games with your phone: This mobile phone has been tested and found to comply with the limits for a Class B digital device, pursuant to Part 15 of the FCC Rules. These limits are designed to provide reasonable protection against harmful interference in a residential installation.
accessory and are not holding the phone at the ear, position the handset a minimum of 1.0 cm from your body when the phone is switched on. Absorption Rate, or SAR. The SAR limit set by the FCC is 1.6W/kg. *Tests for SAR are conducted using standard operating positions accepted by the FCC with the phone transmitting at its highest certified power level in all tested frequency bands.
Compatible for inductive coupling (tele-coil mode) if it has a “T3” or “T4” rating. HOW WILL I KNOW IF MY HEARING AID WILL WORK WITH A PARTICULAR DIGITAL WIRELESS PHONE? You’ll want to try a number of wireless phones so that you can decide which works the best with your hearing aids.