
Installation Guide

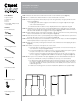


Installation Instructions
Closet Kits 2', 4', 6' and 8'
0300-KITA-2CN, 0300-KITA-4CN, 0300-KITA-6CN and 0300-KITA-8CN
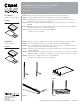
Tools Needed:
• Tape measure
• Stud nder
• Level
• Pencil
• Power drill / Phillips-head
screw driver
Includes:
• 16" Shelf Bracket
• 48" Hang Rail
• 22" Hang Rail Cover
• Closet Pole Kit
• 48" Wall Standard
• Closet Pole Hook
• Mounting Screws
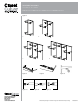
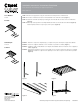
STEP 1: Measure 86" from the oor and make two marks on the wall with a pencil (Figure 1).
STEP 2: Use a stud nder to nd and mark the location of wall studs on the wall.
STEP 3: Install the hang rail into wall studs (the top of the hang rail at 86") using the provided screws
and a level (Figure 1).
a. Installing into wall studs is highly recommended as the hang rail supports the weight
of the entire installed system.
b. If wall studs can’t be located use heavy duty drywall anchors to support the hang rail.
STEP 4: Starting from one side of the closet, hang a wall standard on the hang rail and use a hang rail
cover to create the proper space between that and the next wall standard. Follow this method
until all the wall standards are hanging from the hang rail (Figure 2).
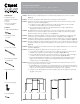
STEP 5: Install shelf brackets by removing the top plastic caps (it’s easiest from the front) and inserting
into the wall standards in the desired conguration (Figure 3).
STEP 6: Install wood or wire shelves (sold separately) by inserting the assembled shelves (which have
four shelf clips) into the slots on the shelf brackets (Figure 4).
STEP 7: When fully seated, push the shelf towards the wall to secure the clips to the bracket (Figure 5).
Install the plastic bracket cap on top to lock in place.
STEP 8: Install closet hooks by inserting into the bottom of the shelf brackets and snapping into place
(Figure 6).
STEP 9: Assemble closet poles and snap into the closet hooks.
a. If using the poles in separate 2' sections, insert the plastic connector and end cap onto
each end of the closet pole (Figure 7a & 7c).
b. If connecting multiple poles together, insert the connectors and push the poles together,
then put an end cap on the ends of the assembly (Figure 7b & 7c).
c. Common closet pole heights (measuring from the oor to the top of the closet pole):
66" for a single pole conguration; 40" and 80" for a double pole conguration (Figure 1).
STEP 10: When system is assembled and in place (Figure 3), level the wall standards vertically and
secure to the wall with two screws per standard (one at the top, one at the bottom).
a. It is likely that the wall standards will not be located over wall studs. Since the weight of
the system is supported by the hang rail (which is mounted into wall studs), the screws
in the wall standards are meant to provide side-to-side stability for the system and not a
load-bearing function.
b. If desired, the mounting screws can also be installed into drywall anchors (not provided).
Figure 2
22.4"
66
40
80
86
66" 40" 80" 86"
Figure 1