
Installation Guide

No-Wire Hanging System
INSTALLATION INSTRUCTIONS
TOOLS
~
PARTS
LIST
\ ~
QP
~
2Mark
e
ra
g
Hammer&phllllpshead
c,
c.?
----~----
~ 1 Bumper
ocr,wdrivor
2
Brackets
1
Level
~
811
1
~------'
4
Scrawa
1
Strtp
of
llpe
11
bra
are
alre
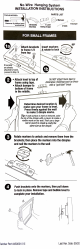
FOR
SMALL
FRAMES
Hach
brackets
o
frame
1/3
Insert
markers
~
9<1'
te
to
lock
attached
to
f
proceed
to
Step
1
A •
Attach
level
to
top
of
Do
~OT
attach
foam
tape
to
V
frame
using
tape.
decora/Jve
moldmgs
such
as
those
e
0
, __
•
Attach
bumper
to
with
a "
gold
leaf
"
finish
bottom
of
frame
:
in
the
middle.
•
Determine
desired
location
&
make
sure
your
frame
is
level.
Press
firmly
against
the
wall
to
make
2
dimple
marks.
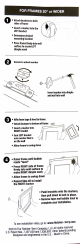
Tip:
If
wall
surface
is
hard
or
textured
,
color
the
tip
of
the
dimple
with
a
crayon
to
make
a
visible
mark
on
the
wall.
Then
use
a
large
nail
or
punch
to
create
a
cavity
the
same
size
as
the
dimple
.
Rotate
markers
to
unlock
and
remove
them
from
the
brackets;
then
place
the
markers
into
the
dimples
and
nail
the
markers
to
the
wall
Push
brackets
onto
the
markers,
then
pull
down
to
lock
in
place.
Remove
tape
and
bubble
level
to
complete
your
installation.
~·
··
1/
1/
'
/etch
er
Part
#4
5
0001015
Last
Rev.
Date:
09/20
1