
User manual
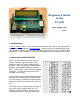


Beginner’s Guide
to the
PI LCD
Part 3: Graphics Intro
, W8BH
1) INTRODUCTION
In Part 1 and Part 2 of this series, we learned how to check the switches and display text on
the LCD board (available from mypishop.com). Now it’s time to learn how to display more
complex data, including graphics. You may have purchased either a 16x2 or a 20x4 display
with your kit. In this write-up I’ll be using the 20x4 display, but a 16x2 will work just as well.
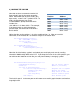
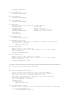
2) THE HD44780 CHARACTER SETS
Here is a list of characters that our LCD can
display. Numbers, uppercase letters, and
lowercase letters are in their standard ASCII
positions. There is a block of unused character
positions in the middle at addresses 0x80 to
0x9F. On the right is a set of Japanese katakana
characters. This ‘A0’ character set is the set
available on my display.
Some controller chips are burned with a different
character set, one that contains European and
Cyrillic characters instead of the Japanese ones.
Interesting! Which one do you have? Let’s find
out.
The easiest way is to send a single character to
the screen, and see what it looks like. For
example, character 0xE0 on my display is the
Greek letter alpha (α). On a chip with the A2