
User manual


6) LOADING THE CG-RAM
Now that we have our artwork encoded, it’s
time to load it into the character-generator
RAM. Remember that we have 8 slots (of 8
bytes each), so our list of 7 symbols will fit. To
load a single character, we send a
‘LOADSYMBOL’ (0x40) command which
includes the
start address in its lower 6 bits. For example,
if we want to store an 8 bit character for
position 0x02, the command will be 0x40 +
0x10 = 0x50.
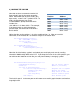
Notice that the starting address is just the symbol position * 8. After we send this
command, all we need to do is to send the 8 bytes as character data:
def LoadCustomSymbol(posn,data):
cmd = LOADSYMBOL + posn<<3
for byte in data:
SendByte(byte,True)
def LoadSymbolBlock(data):
for i in range(len(data)):
LoadCustomSymbol(i,data[i])
Now that all of the battery symbols are loaded, you can display each one by sending
characters 0x00 through 0x07 to the LCD. If you keep the cursor in the same position, you
can animate the character to look like your cell phone ‘battery is charging’ symbol:
def AnimateCharTest(numCycles=8,delay=0.05):
LoadSymbolBlock(battery) #get all battery symbols
GotoXY(1,6) #where to put battery
for count in range(numCycles):
for count in range(len(battery)): #sequence thru all symbols
SendByte(count,True) #display the symbol
CursorLeft() #keep cursor on same char
time.sleep(delay) #control animation speed
time.sleep(1) #wait between cycles
That’s all for part 3. In the next part we will create some useful graph functions and make a
large-digit clock.
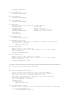
Character
Position
CG-RAM
Address
0x00
0x00 – 0x07
0x01
0x08 – 0x0F
0x02
0x10 – 0x17
0x03
0x18 – 0x1F
0x04
0x20 – 0x27
0x05
0x28 – 0x2F
0x06
0x30 – 0x37
0x07
0x38 – 0x3F