
User manual


4) SMOKE TEST
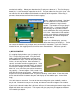
Your Pi should be turned off when your mount your board. Check all your solder joints.
Then mount the board onto the Pi’s GPIO pins. Don’t be a dimwit like me and mount your
display backwards -- it won’t work. The board mounts over the Pi, not away from it.
Check to see that the connector is correctly seated on the pins, and turn on the power.
The backlight on your LCD display should immediately light up, telling you that it has power.
If not, immediately unplug and check everything again.
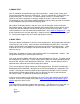
Next, adjust the display contrast, until you see a strip of rectangles across the display.
Don’t skip this step: many folks have checked and rechecked their code for errors, only to
find out later that the code was fine but the display was turned all the way down. Use a
small screwdriver to turn the shaft of the potentiometer. Don’t tickle the dragon’s tail - a slip
of the screwdriver can ruin your whole day. Keep the metal screwdriver tip away from your
Pi. I put a piece of paper over the Pi while adjusting the contrast.
5) BABY STEPS
Once your display is adjusted, it’s time for some programming! But pumping out characters
to our display is not so easy: each character must be broken into two halves, sent to the
display, and clocked in with additional signal that has specific timing requirements. I tried
to do all of this on my first attempt, and of course it didn’t work. Let’s start smaller, and
work our way up.
Fortunately, our board also comes with something much less complicated: switches. We
will get them working first, and then go to the LCD.
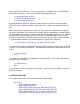
One leg of each push-button switch goes to ground through a 1K resistor. The other side of
the switch goes to a GPIO pin. Push a switch, and the GPIO line will be grounded (logic 0).
We have four switches, each attached to a GPIO pin. We will start with GPIO9, which is
attached to the switch closest to the left edge of the board.
There are two popular Python modules for GPIO programming: RPi.GPIO and WiringPi. I
downloaded and installed both. WiringPi has the current advantage of a companion LCD
module - relieving you of learning about LCD programming! WiringPi also has a familiar
feel to anyone used to Arduino coding. But I am going to skip over it, and write about
RPi.GPIO instead. Try both and see which one you prefer.
If you are using a recent version of Raspian on your Pi, then you already have RPi.GPIO
installed. If not, visit the project home page at http://code.google.com/p/raspberry-gpio-
python/ to get the latest version.
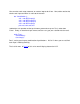
Let’s start with the interactive-mode python interpreter. RPi.GPIO must run from root, so
please login as root and start python. You will see the triple-chevron (>>>) prompt:
$ su
# python
>>>