
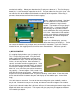
User manual

Import the RPi.GPIO module. The first thing we’ll do is configure it to use the Broadcom
port-numbering scheme. And we’ll turn off warnings about port usage:
>>> import RPi.GPIO as GPIO
>>> GPIO.setmode(GPIO.BCM)
>>> GPIO.setwarnings(False)
If python complains at the first statement, make sure that: 1) you have already installed
RPi.GPIO; 2) you spelled it correctly, with a lower-case ‘i’; and 3) you started python from
root.
Now we are ready to specify which I/O pins we are going to use, and how we are going to
use them. Remember, we are going to use GPIO9, which is attached to the leftmost switch.
We must declare it as an input. And we need to enable the built-in pullup resistor. Without
a pullup, floating (unconnected) inputs have random, unpredictable logic values. Pullup
resistors make sure that, in the absence of any electrical input, the input value will be logic
1. All of the above conditions are accomplished by a single python statement:
>>> GPIO.setup (9, GPIO.IN, pull_up_down=GPIO.PUD_UP)
Assuming that you got no feedback from the four python statements above, input on GPIO9
is ready. Lets see what value we get. Remember that the internal pullup keeps the line at
logic 1:
>>> GPIO.input(9)
True
Try it again, this time while pressing down on the push-button. The closed switch should
pull the input line to logic 0:
>>> GPIO.input(9)
False
If you got these results, everything is working fine. Type exit() to leave python. It’s time to
write a real program.
6) WRITING THE CODE
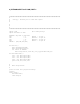
First, lump all of the GPIO setup statements into a single function:
def InitIO ():
GPIO.setmode(GPIO.BCM)
GPIO.setwarnings(False)
GPIO.setup(4, GPIO.IN, pull_up_down=GPIO.PUD_UP)
GPIO.setup(23, GPIO.IN, pull_up_down=GPIO.PUD_UP)
GPIO.setup(10, GPIO.IN, pull_up_down=GPIO.PUD_UP)
GPIO.setup(9, GPIO.IN, pull_up_down=GPIO.PUD_UP)