
Instructions / Assembly


10
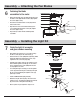
Assembly — Attaching the Fan Blades
6
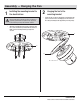
Fastening the blade
assemblies to the motor
□ Attach the fan blades (A) to the blade bracket (B) using
the blade screws (AA) and ber washers (BB). Tighten
the screws (AA) securely.
□ Remove the ten blade bracket screws (CC) from the
bottom of the motor.
□ Align the motor holes to the blade bracket (B) and
secure with the blade bracket screws (CC). Tighten
the screws (CC) securely.
□ Repeat this procedure with the remaining blade
assemblies.
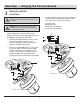
□ Disassemble the switch house cover (I) by removing
the three screws (VV) on the switch house (J).
□ Remove the three screws (WW) in the light kit (F). While
holding the light kit assembly under your fan, snap
together the wire connection plugs (XX).
□ Carefully push all wires back into the switch house (J),
then install the light kit assembly (F) onto the switch
house (J) with the three screws (WW) removed and
securely tighten all screws.
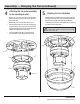
□ To install light kit glass shade (G), loosen the light kit
screws (YY) and install the glass shade (G) to the light
kit (F). Secure by tightening the light kit screws (YY)
previously loosened.
□ Install 3×60W A15C bulbs (GG) (included).
□ Restore power and your light kit is ready for use.
□ Attach the fan pull chain fob (EE) to the chain on the
switch house (J), and attach the light kit pull chain fob
(FF) to the chain on the light kit assembly (F).
7
Finish the light kit assembly
and glass shades mounting
Assembly — Installing the Light Kit
B
AA
BB
CC
VV
J
I
J
XX
F
G
GG
WW
A
YY
FF
EE