
Installation Guide


Surface Preparation:
o Here is a basic list of surface preparation suggestions for the installation of any
flooring project. Many are especially critical for hardwood flooring because even a
small oversight in sub-floor preparation can lead to problems which significantly
detract from the final appearance and long term service.
The subflooring must be level and flat. High spots must be sanded and low
spots filled or shimmed.
Subflooring must be solid. Loose joints must be re-nailed. Not only does
this make for a good, solid feel to the floor, but it also prevents long term
problems with noise.
Follow the flooring manufacturer’s recommendations for a continuous
barrier paper or felt installation under the new flooring. It is essential that
wood flooring be given a chance to expand and contract with the seasons. A
continuous slip surface under the flooring allows this movement to happen
without putting stress on flooring joints.
Don’t forget to sweep and remove any dirt and scraps before laying any
barrier. Even small pieces can telegraph through the finished flooring.
Installation:
A. Measuring and cutting:
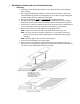
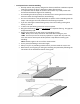
a. Using a quality tape measure, obtain the exact width of the doorway between the
floors.
b. Transfer this measurement to you moulding. Using a carpenter’s square, lightly
draw a line on your moulding to designate the cut line.
HINT: Double check your measurement before cutting.
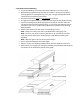
c. The best cuts will be obtained using an electric miter saw with a new cross-cut
blade. However, a good mechanical miter saw can provide an equally acceptable cut
when used with care.
HINT: In order to provide additional protection against chip-out in the cutting
process you can apply blue painter’s tape across the moulding at the point
where you anticipate making your cut. Then measure and scribe the cut line on
the painter’s tape.