
Installation Guide


Installation: (Continued)
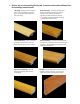
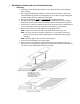
B. Gluing Moulding in hold down position:
a. Purchase a high quality construction grade adhesive and calking gun applicator.
b. Apply ¼'' bead on the sub-flooring where the moulding will be in contact.
HINT: Remember do not apply the glue to any area which will impede the finished
wood floor’s ability to expand/contract with seasonal changes.
c. Set the moulding into the gap, pressing firmly so that the moulding lips rest firmly on
flooring.
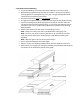
HINT: Mouldings must be installed within 10 minutes of adhesive application.
d. Apply firm pressure across the entire moulding surface to ensure good contact with
the adhesive.
e. Wipe any glue which may have oozed out with a damp cloth.
f. Strips of blue painter’s tape may be placed across the t-moulding and onto both
floors to hold the moulding in finished position until the adhesive is dry (minimum of
24 hours).
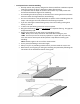
C. The Nail-Down Method:
a. Use 18 gauge finishing nails for jobs requiring up to 2” nails. Most transition
mouldings can be successfully installed under this guideline.
b. Pre-drill holes to avoid splitting mouldings especially when nailing near the ends of
the mouldings.
c. Obtain a block of paraffin obtainable in the canning section of the grocery store.
Rub the sides of the finishing nails on the paraffin. This provides an excellent friction
reducer and allows nails to be firmly hammered into place while avoiding bending
the nail.
d. Hammer the nail to just above the surface of the moulding. This avoids creating
hammer dents in the surface of the moulding.
e. Use a new nail set to bring the nail to just below the surface of the moulding.
f. Obtain a wood filler crayon or putty stick which most closely matches the color of
your moulding. Fill the hole created by the nail head per instructions and wipe the
surface smooth.