
Installation Guide


Moulding Descriptions and uses and installation hints:
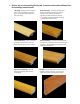
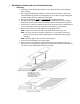
o T-Moulding
Used when the new flooring installation is the same thickness as any adjacent
floor covering.
Don’t forget wood flooring expands and shrinks with the seasons. Never butt
new wood flooring against any existing flooring or any wall. The gap is designed
to allow interference free expansion/contraction.
Bring the new flooring up to but not touching the adjacent flooring.
This gap can be approximately one-half of the overall width of the t-moulding
being used, but should at least be the width of the t-moulding center leg plus ¼”.
Insure there is room for the width of the center extension on the t-moulding and
clearance between this center extension and the flooring on both sides.
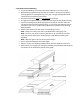
Measure the distance you will require the t-moulding to cover.
HINT: Always use a sharp saw and or saw blade when making any cuts.
HINT: To insure you do not create any splinters or rip-out with any saw cuts,
cover the saw line with a piece of blue painter’s tape before trimming your
moulding.
HINT: Measure again to be sure of this measurement.
Trim a piece of moulding to this exact length.
Always “dry-fit” any moulding to determine if you have made the correct cut.
Determine if you are gluing or nailing the moulding and proceed by following the
instructions in the Installation Section of this guide.