
Instructions / Assembly


Installation & Assembly Instructions
Please contact our Customer Service Division with any questions at:
30700 D Carter Street ∙ Solon, OH 44139 ∙ (P) 440.248.5480 ∙ support@tritonproducts.com
For a full line of products visit www.tritonproducts.com 2 INS3500
8. For wood studs use 2-1/4” long wood screws. Always install wood screws last and there will be no need to use
plastic wall anchors.
9. Using a level and holding top track in place tighten one of the end toggle bolts or wood screws until snug. (Allow
for track movement).
10. Making sure top track is still level, tighten toggle bolt or install wood screw on the opposite end until fully secure
and then go back and fully tighten the first toggle bolt.
11. Install and fully tighten all remaining toggle bolts or wood screws.
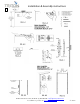
Hang Rail Assembly: (Fig. B-1) Assemble (2) 63”long hang rail assembly consisting of 3 parts, (A) Top Slotted
section (B) Bottom rail section and (C) Hang rail connector with 2 bolts.
Hanging Hang Rails: (Fig. B-2, and B-4). Note: When installing hang rails, work from left to right or right to left and
always installing one hang rail at a time.
12. (Fig. B-2 and B-3) Slide each hang rail assembly onto front lip of the top track. Position each hang rail at opposite
ends of the track.
13. Starting from one end, make sure the top outside edge of the hang rail is no greater than 1/8” away from the
outside vertical straight edge of the top track. Using a level, make sure hang rail is flat against wall surface and
straight; while holding in place mark the centers of the 3 bolt holes locations onto the wall.
14. Drill locations marked in Step 13 using the correct drill bit for your type of wall surface. (Refer to drill diameter
listing above.) Note: Should you come in contact with a wood stud stop drilling and mark hole with an X. After
drilling all other holes come back to the X and using a 1/16” bit, create pilot hole for wood screw installation.
Attaching Hang Rails to Wall Surfaces; (Fig.B-4 thru B-6)
15. Hollow walls: Use 3-1/2” long toggle bolts with expanders. Remove hang rail from top track, and insert toggle
bolts through holes in hang rail and attach all toggle bolt expanders. Re-install hang rail and insert toggle bolts
with expanders into holes in wall before starting step 18.
16. Concrete walls: Use white plastic wall anchors and 2-1/4” long wood screws. Install all plastic wall anchors in
holes before starting step 18.
17. Wood studs: Use 2-1/4” long wood screws.
18. Using a level and keeping hang rail straight, tighten bolts.
Second Hang Rail Attachment: (Fig. B-4 thru B-6)
19. Slide the second hang rail to the opposite end of top track. Inside spacing between hang rails should be 30.25”
(30-1/4”).
20. Using a level, make sure your second hang rail is straight and that you have easy removal of tool board and
combination rail from both hang rails mark the centers of the bolt holes onto your wall surface.
21. Drill out holes for your wall surface and complete installation by following steps 15-18.
22. Accessory Installation: Always make sure you’re installing all accessories level and into the identical height slots
in both hang rails. Binding can occur if not level. All accessories will be installed in the inside slot positions of
each hang rail. If accidental binding occurs use soft rubber mallet to help remove accessory and protect the paint.
Warranty Information: All steel components are guaranteed free of defect for the life of the product. Return defective
parts only postage pre-paid along with copy of your original purchase receipt to: