
Installation Guide


Distributed by
The Matworks Company, LLC / 11900 Old Baltimore Pike / Beltsville, MD 20705 / www.thematworks.com
See current edition of the Resilient Floor Covering Institute (RFCI) publication Recommended
Work Practices for Removal of Resilient Floor Coverings for instructions on removing all
resilient floor covering structures.
The floor covering or adhesive in this package does NOT contain asbestos.
Installation
Cutting Pronto
• Measure tiles to be cut carefully and mark with a pencil, chalk or felt-tip pen.
• Make straight or diagonal cuts with one of the two methods below:
• Wet saw – Cut on the line as you would with standard porcelain tile.
• Tile Cutter / Utility Knife (no fiberglass mesh):
o Using square, transfer the mark on the porcelain top to the Pronto base.
o Ensure the marks on the top and bottom are aligned.
o Score the porcelain top with a tile cutter.
o Score the Pronto bottom with a utility knife.
o Snap the piece.
Installation
• For best appearance planks should be installed parallel to the long dimension of the
room and preferably parallel with outside light sources i.e. windows and doors.
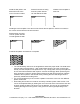
• Inspect the planks and to avoid installing planks with similar patterns/colors next to each
other. Carefully selecting planks from several boxes will significantly reduce the effect of
any shade variations as well as increase the authenticity and beauty of your floor.
• Carefully measure the room to determine squareness and to determine the width of the
last row of planks.
o If the width of the last row of planks is less than 2” excluding the tongue, cut and
adjust the width of the first row of planks accordingly.
o The first and last pieces of each row should be at least 12”. Cut and adjust the
length of the first plank in the row.
• During installation, inspect the groove area for any debris that may prevent proper
assembly and locking.
• The tongue side of the plank shall face the starting wall, groove side facing outwards, to
get closest to the wall.
• Install planks in a random layout. Start with a whole plank in the left hand corner of the
room with the tongue side and end toward the wall. Lay the first row of planks along the
chalkline and trim to fit to the wall allowing a ¼”expansion space.
Note: If starting the first row with a whole width plank it will be necessary to trim the
tongue off against the wall. Always place the cut edge against the wall. To trim planks,
use a utility knife and a straight edge. Score the top surface of the plank and flex it
downward to separate the pieces.
• The first row of planks must be glued in place to make a secure course for subsequent
rows.
• Connect planks by laying the plank flat and sliding the tongue of the current plank into
the groove of the previous plank.
• Use a wood block and rubber mallet to tap the joints into place, ensuring a tight fit
between all joints.