
Installation Guide


Distributed by
The Matworks Company, LLC / 11900 Old Baltimore Pike / Beltsville, MD 20705 / www.thematworks.com
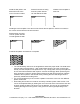
Install the first plank in the
back left corner of the
room, by gluing in place.
Start the second row using
2/3rd of a plank with the
cut end against the wall.
Install the second plank in
each row.
Installing the second plank in the second row ensures the two planks in the first row will be in
the correct line and ensures all joints are tight.
Start the third row using
1/3rd of a plank with the
cut end against the wall.
Continue this pattern until the floor is complete
• The Last Row May need to be cut lengthwise to obtain the proper width. The width of the
last row shall not be less than 2”. Align a plank that has been cut to the correct length
exactly over the first plank in the previous row. Lay a scrap plank over top of the plank to
be cut and mark the distance with a pencil. Cut each accordingly. When performing this
step, remember to allow for proper spacing between the wall and the last row of planks.
Install the second plank in the second row by inserting the short side tongue into the
previously installed short side groove.
• It is recommended that you do not have a pattern in which the corners on four different
planks would meet.
• When fitting around door trim it will be necessary to slide the plank under the trim. This
can be accomplished easily by starting the row on the side of the room with the door trim
and then sliding the plank into place once it is attached. The row can be completed by
inserting the tongue in to the groove or the groove into the tongue depending on the
direction.