
Installation Guide


Distributed by
The Matworks Company, LLC / 11900 Old Baltimore Pike / Beltsville, MD 20705 / www.thematworks.com
Completing the Job
• Remove all spacers. Install wall trim lightly over the floor surface. Drive fasteners into the
wall and not the floor. When installing doorway transition moldings allow a ¼” expansion
space between the edge of the floor and the molding. Do not drive fasteners in to the
floor. Return appliances to the room by rolling or sliding over strips of hardboard to
prevent damaging the floor.
Note: For new construction installations, following the installation and clean up,
protect it by laying sheets of breathable brown Kraft paper over the flooring and
then a layer of plywood sheets. Leave until the wood of all trades has been
completed.
Floor Care
• Frequently moved furniture should be equipped with felt pads to avoid scratching the
floor. Heavy furniture and appliances should be equipped with non-staining large surface
floor protectors. Furniture with castors or wheels must be easy swiveling, large surface
non-staining and suitable for resilient floors. Do not use ball type castors as they can
damage the floor.
• Avoid exposure to long periods of direct sunlight. Close blinds or drapes during peak
sunlight hours.
• Use walk off mats at entrances to prevent dirt and grit from being tracked on to the floor.
• Sweep or vacuum the floor regularly to remove loose dirt. Avoid using a vacuum with a
beater bar.
• Clean up spills immediately.
• Damp mop as needed using clean water and a diluted floor cleaner.
Stairs
Pronto Plank Flooring is not recommended for use on stairs or steps.
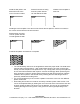
REPLACING/REPAIRING PRONTO PLANK
1.) To remove plank that is not on the perimeter of the flooring, use a marker and straight edge
and draw a frame around the perimeter of the plank, ½” in from the edge.
2.) Use a Grinder with a stone wheel to cut out the frame, creating a “Chipping Channel” down
to the sub-floor.
3.) Use a Grinder with a stone wheel to make cross cuts along width of the plank, to facilitate
removal by sections.
4.) Scrape out all debris with Hand Scraper and trim off all remaining locks from adjacent plank.
5.) Trim lock off the new plank that will be installed.
6.) Apply adhesive, in accordance with manufacturer’s instructions, and place new plank in
place, by holding level and installing straight down.
7.) Press plank into place, ensuring it is level on all four sides, with adjacent planks.