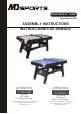
TM MODEL/MODELO: 1616603 Sears/Kmart USA ASSEMBLY INSTRUCTIONS INSTRUCCIONES DE ARMADO ATTENTION DO NOT RETURN TO THE STORE Contact MD Sports Customer Service * For additional resources and Frequently Ask Questions, please visit us at themdsports.com ATENCIÓN NO DEVOLVERLO A LA TIENDA Contacto MD Sports Servicio al Cliente * Por mayor información y Preguntas Frecuentes, favor visitarnos en themdsports.
English Español LIMITED 90 DAYS WARRANTY GARANTÍA LIMITA DE 90 DIAS This product is covered by a limited warranty that is effective for 90 days from the date of purchase. If, during the limited warranty period, a part is found to be defective or broken, we will offer replacement parts at no cost to you, the customer. The only exceptions to the warranty include mainframes, table tops, playing surfaces, batteries or tools.
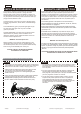
English Español Herramientas Necesarias TOOLS REQUIRED Phillips Screwdriver - Not Included Standard (Flat Head Screwdriver) - Not Included Wrench - Not Included Allen Key - Included CAUTION ! Destornillador Phillips - No Incluido Destornillador de Cabeza Plana - No Incluido Llave Inglesa - No Incluido Llave Allen - Incluido Power Tools - Set Low Torque High Torque over tightened ¡PRECAUCI N! Los destornilladores eléctricos pueden ser de gran ayuda durante el ensamblado; sin embargo, por favor ajuste
English Español IMPORTANT SAFETY INSTRUCTIONS Read all instructions IMPORTANTES INSTRUCCIONES DE SEGURIDAD Lea todas las instrucciones 1. Read all instructions-All the safety and operating instructions should be read carefully before this hockey game is played. 2. Caution-This is not a toy and is intended for use by or under the supervision of adults.Adults should review safety guidelines with children to avoid possible risk of electric shock or other injuries. 3.
English Español IMPORTANT SAFETY INSTRUCTIONS Read all instructions IMPORTANTES INSTRUCCIONES DE SEGURIDAD Lea todas las instrucciones 10. CAUTION-ELECTRICALLY OPERATED PRODUCT-Not recommended for children under 8 years of age. As with all electrical products, precautions should be observed during handling and use to reduce the risk of electric shock. 11. We recommend that the game be periodically examined for conditions that may result in the risk of fire, electrical shock, or injury to persons.
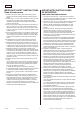
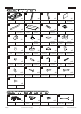
English Español 1616603 PARTS LIST / LISTA DE PARTES 1 2 3 x1 Mainframe x2 Unidad Principal 5 Left Leg x2 Pierna Izquierda 6 Panel de Pierna Lateral Table Tennis Surface 13 11 Leg Leveler Felt Pad 17 Pusher Gorra Final Allen Key 5/16” Washer Arandela 5/16” Tornillo 3x15mm 5/16” x 2” Bolt Cerrojo 5/16”x2” A6 x12 3x15mm Screw Soporte de Marcador - A x12 Llave Allen A5 x12 Scorer Support - A x1 Soporte de Marcador - B Scorer Support -B x2 A2 x2 A4 A3 Puck Redondo A1
Español English 1616603 PRE-INSTALLED PARTS / PIEZAS PREINSTALADAS P5 P6 x2 Puck Catcher Colector Puck x4 Apron Corner Delantal de Rincón ASSEMBLY INSTRUCTIONS: INSTRUCCIONES DE ENSAMBLAJE 1. Find a clean, level place to begin the assembly of your 1. Encuentre un lugar limpio, plano para comenzar el montaje de su Mesa Combo. La mesa será montada al revés y Combo Table.
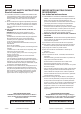
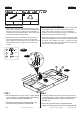
English 7 X1 16 X2 18 X2 A7 X8 Español A7 FIG. 2A A7 FIG. 2 A7 FIG. 2B 18 7 18 A7 16 FIG. 2A Assembly / Montaje FIG. 2A FIG.2 FIG.2 5. Conecte los Marcador Electrónico (#7) y Soporte de Marcador - B (#18) juntos. Vea FIG. 2A. Adjunte el Montaje FIG. 2A al Soporte de Marcador - A (#16) usando 1 Tornillo (#A7) por Soporte de Marcador. See FIG. 2B. 5. Connect the Electronic Scorer (#7) and Scorer Supports - B (#18) together. See FIG. 2A. Then attach the FIG.
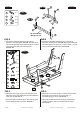
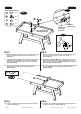
Español English 4 X2 10 X4 A4 X 12 P2 X4 FIG. 4 10 P2 4 4 A4 FIG.4 FIG.4 8. Adjunte el Panel de Pierna Final (#4) a las piernas usando 6 Tornillos (#A4) por Panel de Pierna Final. See FIG. 4. 8. Attach the End Leg Panels (#4) to the Legs using six Screws (#A4) per End Leg Panel. See FIG. 4. 9. Screw the Leg Levelers (#10) into the bottom of each leg. 9. Atornille los Niveladores de Pierna (#10) al fondo de ca da Pierna. 10. Lift the table assembly from the floor with two adults, 10.
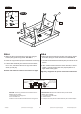
English Español FIG. 5A 11 X2 14 X2 17 X2 A6 X2 FIG. 5 8 1 17 A6 7 FIG. 2B Assembly / Montaje FIG. 2B Scorer wire / Cable de marcador Goal wire / Cable de gol FIG. 5B 1 11 14 FIG.5 FIG.5 11. Attach the the FIG. 2B Assembly to the Mainframe (#1) using two Screws (#A6) and two End Caps (#17). See FIG. 5. 11. Adjunte el Montaje FIG. 2B a las Unidad Principal (#1) usando 2 Tornillos (#A6) y 2 Gorras Final (#17). Vea las FIG. 5. 12.
English Español P5 P5 P1 P4 P4 ! WARNING: 1) Require 3 pcs “AAA” Batteries (Not included). 2) Do not mix old and new batteries. 3) Do not mix alkaline, standard (carbon zinc), or rechargeable (nickel - cadmium) batteries. ADVERTENCIA: 1) Requiere 3 piezas de Baterias “AAA” (No incluido). 2) No mezcles baterias viejas y nuevas. 3) No mezcles baterias alkalina, estándar (carbón zinc), o recargable (níquel-cadmio). ! ELECTRONIC SCORER OPERATION OPERACIÓN DEL MARCADOR ELECTRÓNICO 2. Reminding: 2.
Español English ELECTRONIC SCORER OPERATION OPERACIÓN DEL MARCADOR ELECTRÓNICO Nota: Note: 1. You can press the “RESET” button at any time, to set the 1. Ud. puede apretar el botón “RESET” en cualquier momento, para poner el marcador al estado principal. scorer back to the beginning status. 2. You can press “ON / OFF” at any time to turn off the scorer. Press “ON / OFF” again to turn it back on. 2. Ud. puede apretar “ON / OFF” en cualquier momento para apagar el marcador.