
Instructions / Assembly


CAUTION
The pump is intended to pump water only. It cannot be used to pump oil, solvents, or gasoline. Although the pump will continue to
run if there is no water, after 30 minutes damage may occur if allowed to run dry.
ZG120 Rev.D 12/16
CARE AND OPERATING INSTRUCTIONS FOR MAGNETIC DRIVE 2-7 PUMPS
ITEM # 02512, 02513, 02515, 02517, 02522, 02523, 02525, 02527
SAVE THESE INSTRUCTIONS
INSTALLATION INSTRUCTIONS
used with inline piping note the following: Centrifugal pumps cannot pull water from a lower level. In order to start, pump must be below
water level and filled with water. Unless the air can escape from the outlet, the pump will not start. Do not use glues or solvents to connect
the pumps threaded fittings. Use Teflon pipe tape. The pump cover is not designed to support long pipe runs or to correct pipe misalignment.
To remove the base, strike with moderate force in the direction toward the pump cover. The latch will bend and the base will slide off the
housing. To attach the base, slide the base (latch first) on the pump cover side of the housing. Slide the base onto the dovetail mounting
tracks until the latch snaps.
1
SERVICE AND MAINTENANCE
The pump cover should occasionally be removed to clean and inspect the impeller assembly. The impeller is the only serviceable item and
can be pulled out of the body . Do not take the impeller apart except for cleaning when used in salt water or hard water applications; see
below. If it is worn or broken the entire impeller assembly should be replaced. This will restore the pump to original capacity. Pumps taken out
of service for an extended period with fluid inside run the risk of forming a crust which may prevent subsequent starting. Saltwater should
be flushed out with fresh water. Always check cord for sharp bends which can cause premature cracking. Do not use power cord to lift
or move pump. Other than Impeller assembly, this appliance has no user serviceable parts.
IMPORTANT: FOR PUMPS USED IN SALTWATER OR HARD WATER
Magnet impeller assembly must be routinely removed for cleaning with Pumpguard
TM
(sold separately)
to remove accumulations of scale or
calcium. This procedure should be done at least once every three months - or more often if the water conditions require it.
Disassemble magnet from impeller by pulling them apart (it may take a strong pull). One end cap will come off. To clean the calcium scale
off the shaft and bearing inside of the magnet, soak in Pumpguard. Rinse and reassemble magnet / impeller assembly. Do not lose any
washers located between the end cap and impeller.
Pondmaster Pumpguard - 4oz. (#03905), 32 oz (#03907), 1gal. (#03909)
Supreme Pumpguard for Aquarium - 4oz. (#40770), 32 oz (#40771), 1gal. (#40773)
Supreme Pumpguard for Hydroponics - 4oz. (#06331), 32 oz (#06335)
IMPORTANT SAFETY INSTRUCTIONS
WARNING – To guard against injury, basic safety precautions should be observed, including the following:
a) READ AND FOLLOW ALL SAFETY INSTRUCTIONS.
b) DANGER – To avoid possible electric shock, special care should be taken since water is employed in the use of aquarium equipment. For
each of the following situations, do not attempt repairs by yourself; return the appliance to an authorized service facility for service or discard
the appliance:
1) If the appliance shows any sign of abnormal water leakage, immediately unplug it from the power source. (Immersible equipment only)
2) Carefully examine the appliance after installation. It should not be plugged in if there is water on parts not intended to be wet.
3) Do not operate any appliance if it has a damaged cord or plug, or if it is malfunctioning or has been dropped or damaged in any manner.
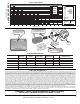
4) To avoid the possibility of the appliance plug or receptacle getting wet, position aquarium stand and tank to one side of a wall-mounted
receptacle to prevent water from dripping onto the receptacle or plug. A “drip loop,” shown in the figure below, should be arranged by the
user for each cord connecting an aquarium appliance to a receptacle. The “drip loop” is that part of the cord below the level of the
receptacle, or the connector if an extension cord is used, to prevent water traveling along the cord and coming in contact with the recep-
tacle. If the plug or receptacle does get wet, DON’T unplug the cord. Disconnect the fuse or circuit breaker that supplies power to the
appliance. Then, unplug and examine for presence of water in the receptacle.
c) Close supervision is necessary when any appliance is used by or near children.
d) To avoid injury, do not contact moving parts or hot parts such as heaters, reflectors, lamp bulbs,
and the like.
e) Always unplug an appliance from an outlet when not in use, before putting on or taking off
parts, and before cleaning. Never yank cord to pull plug from outlet. Grasp the plug and pull to
disconnect.
f) Do not use an appliance for other than intended use. The use of attachments not recommended
or sold by the appliance manufacturer may cause an unsafe condition.
g) Do not install or store the appliance where it will be exposed to the weather or to temperatures
below freezing.
h) Make sure an appliance mounted on a tank is securely installed before operating it.
i) Read and observe all the important notices on the appliance.
j) If an extension cord is necessary, a cord with a proper rating should be used. A cord rated for less amperes or watts than the appliance
rating may overheat. Care should be taken to arrange the cord so that it will not be tripped over or pulled.
PUMP
POWER
SUPPLY
CORD
WATER
TANK
DRIP
LOOP
RECEPTACLE
This appliance should be grounded to minimize the possibility of electric shock. This
appliance is equipped with an electric cord having an equipment grounding
conductor and a grounding type plug. The plug must be plugged into an outlet that
is installed and grounded in accordance with all appropriate codes and ordinances.
This appliance is for use on a nominal 120-volt circuit, and has a grounding plug that
looks like the plug illustrated in (A) below. A temporary adapter which looks like the
adapter illustrated in (B) and (C) below may be used to connect this plug to a two-pole
receptacle as shown in (B) if a grounded outlet is not available. The temporary adapter
should be used only until a grounded outlet can be installed by a qualified electrician.
The green-colored rigid ear (lug, and the like) extending from the adapter must be
fastened to a permanent ground such as a grounded outlet box.
GROUNDING INSTRUCTIONS
METAL
SCREW
COVER OF
GROUNDED
OUTLET BOX
ADAPTER
GROUNDING
MEANS
GROUNDING
PIN
(A)
(B)
(C)