USE AND CARE GUIDE 3 LIGHT LED AC PUCK LIGHT KIT (WHITE FINISH) Questions, problems, missing parts? Before resuming to the store, call Customer Service 8am. -7 p.m., EST, Monday Friday, 9 a.m. 6 p.m.
Warranty LIMITED WARRANTY ‘The manufacturer warrants this product to be fez rom defects in materials and workmanship for a period of five (5) years from date of purchase.
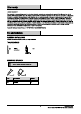
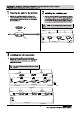
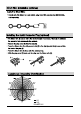
Institutionalization Starting installation from the ie ids oi your cabin “Right side cabinet Installation refer to option 2 page #* 1 Preparing the lights for the first time 2 Installing the mounting caps © Separate the mutinying cap (3) that a attached to the © Installer mounting cap (5) the underside of the cabinet LED puck assembly (4) by rotating the mounting can (5) ly Inserting mounting crews (AA) Ik the mounting holes on counterrevolutionary.
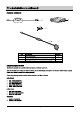
4 connecting the LED puck lights © Gonna ct the LED puck assemblies to each other. Conn ct the power cord (Dt th Sst puck light. clo olo r= 5 Securing the cords © Usa gallon factors (BB) to attach the wire % the cabinet.
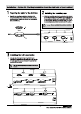
Installation piton #2 Starting ratio) m the right side :cabinet 1 Preparing the lights for the first time 2 Installing the mounting caps a Apparatus the mounting cap (3) that a attached to the Inst the mounting ow (5) the underside of the cablecast LED puck assembly (8 by rutting the mounting cag 5) by Inserting outing screws (A4) Into the mounting holes an counterrevolutionary. Ra peat this stein for the ramming LED tha mounting cap (E). Line up the scow holes at tha 12 and puck assemblies (A).
4] connecting the LED puck lights © Octagon the LED puck ambiguities to each other. Connect the power cord (D) to th ist puck light. 5 Securing the cords Usa gallon tenors (BE) to attach the wire % tho cannot.
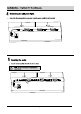
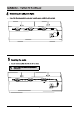
Convert to Direct Wire: © Directly wire this fixture to a wall switch using Direct Wire Junction Box {SKU494469), sold separately. = The fixture wire (1) can be cut to the desired length if necessary. This helps to minimize the amount of wire underneath the cabinets. = Remove the plug cover (2) from the plug (3). o Press the fixture wire (1), with grooved side (4) to the right {neutral side) down and inch the front of the plug (3). = Press the fixture wire (1) down onto the metal prongs.
Questions, problems, missing parts? Be fora returning to the store, call Customer Service 8am. -7 p.m., EST, Monday Friday, 9 a.m. & p.m., EST, Saturday 1-877-527-0313 HOMEOPATHIC Retain this manual for future use.