
Installation Guide
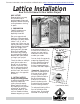

Do More With Every Project!
saw, ensure the "face" side
of the lattice is up. When
using a rotary saw, ensure
the "back" side is up.
When a curve or angle cut
is desired, use a fine-
toothed keyhole saw or
power saber saw.
For easy cutting, mark
cut-line on lattice with a
chalk line.
To ensure a clean, safe cut,
it is important to support
the panel of lattice along
both
sides. (A partner can
make the sawing much
easier, by supporting the
panel for you. Make sure
your partner is wearing
safety glasses, too). Near
the end of a cut, support
the lattice panel firmly!
Make sure the support is
as close as possible to the
cut line. Hold your lattice
down firmly to avoid
splitting or tearing of
the wood.
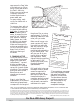
3. FRAMING LATTICE
Once your lattice is cut to
size, protect the exposed
edges of the panel with
Lattice Basics™ cap and
divider moulding (see
illustrations of C-channel
cap and H-channel divider
moulding). This moulding
gives your lattice a neat,
attractive trim and
strengthens the overall
structure.
Keep in mind that the
measurement of the side of
lattice being framed must
correspond to the length of
the cap at the bottom of
the groove. Plan on using
approximately 1" of extra
moulding material for each
miter joint you make.
Make sure all corner cuts
are at a precise 45˚ angle.
Use miter box and hand
saw at a precise 45˚ angle
to bevel ends of the
moulding before attaching
to your lattice panel. This
will give you all of your
corner joints a neat and
tight apperance. Attach
caps and divider moulding
to lattice with 1-5/8"
screws at the miter joints,
from both directions
(see illustration).
Drill small pilot holes near
the edges of lattice, where
screws are required, to
ensure moulding and
lattice do not split. When
framed lattice panel is
complete, secure the panel
in place with screws so it
may be easily removed for
maintenance or repair.
*The manufacturer encourages
you to seek professional advice
and review local building
codes prior to construction.
The manufacturer does not
provide any warranty and
shall not be liable for any
damages, including
consequential damages.
C-Channel
Cap Moulding
H-Channel
Divider Moulding
Attach caps and
divider moulding
to lattice with
1 5/8 galvanized
screws
The diagrams and instructions in this brochure are for illustrative purposes only, and are not meant to replace a licensed professional. Any construction or use
of the product must be in accordance with all local zoning and/or building codes. The consumer assumes all risks and liability associated with the construction
or use of this product. The consumer or contractor should take all necessary steps to ensure the safety of everyone involved in the project, including, but not
limited to, wearing the appropriate safety equipment. Universal Forest Products, Inc., makes no warranty, either express or implied, and shall not be liable for
any damages, including consequential damages.
Basic Tool Checklist
• Power saw or fine-toothed
handsaw
• Fine-toothed key hole saw
or power saber saw (if
planning a curved or
angled cut)
• Drill, for pilot screw holes
• Screws (See Note below)
• Small screwdriver
• Pliers
• Chalk line
* Check your local building codes
and/or homeowner association
covenants to determine if you need a
permit to complete your project.
Mitered Corner
© 2001, 2004 Universal Forest Products
®
Inc.
www.ufpi.com
2529_04
Note: For ACQ treated wood, use hot-dip galvanized meeting ASTM-A153/A653, 304 or 316 stainless steel
or other fasteners and hardware as recommended by the manufacturer.