
Installation Guide


CUTTING:
Use a fine-tooth hand saw or power saw with a combination blade. Cut into the exposed face of the
material. Carbide-tipped blades are recommended.
FASTENING REQUIREMENTS:
MiraTEC trim is a non-structural decorative trim product and should not be used where structural
lumber properties are required. MiraTEC trim is designed to be applied to structural framing, sheathing
and other materials.
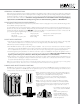
* Note: Nail at least 1/2˝ from the edge. Do not nail into the edges of MiraTEC trim. For 4/4 and 5/4 fascia and soffit
applications, MiraTEC trim can be fastened directly to the rafter ends, double nailed a minimum of 24˝ on center. For 5/8
fascia and soffit applications, MiraTEC trim must have a sub-fascia and be nailed 16˝ on center to the rafter ends or sub-
fascia. For all other horizontal and vertical applications, double nail 16˝ on center, falling on the studs.
Fasten MiraTEC trim from DO NOT nail toward the
one end to the other end. center from both ends.
BUTT JOINTS:
All joints must fall over a framing member. MiraTEC trim can be mitered, scarfed, or beveled as required.
For runs less than 30 feet in length, butt joints should lightly touch. For runs over 30 feet in length, space all
butt and scarf joints 1/8˝ apart and apply sealant into the full depth of the 1/8˝ joint. Double nail all joints
on both sides as noted in the diagram.
When mitering for column wraps or corner boards, CMI recommends gluing the edges of the trim to
maintain a tight joint. Use a quality exterior grade yellow carpenters glue or high quality polyurethane
adhesive. Lightly ease the edge of the finished corner with 220 grit sand paper for best paint adhesion.
FASTENERS:
Always use fasteners appropriate to the style of construction where the trim is installed. Fasteners must be equal or
better in performance (such as nail withdrawal, bending strength and corrosion resistance) to 6d or 8d 15 gauge finish
nails or headed nails, long enough to penetrate 1 1/4˝ into structural wood studs or studs and structural sheathing
material. Use nails with corrosive resistance equivalent to hotdipped galvanized nails. For installations near oceans, large
bodies of water or in high humidity climates, CMI recommends using stainless steel fasteners on MiraTEC trim. For
these installations, do not use electro-galvanized fasteners, due to poor long term rust resistance.
Power or pneumatic nailing systems may be used. Visit www.miratectrim.com for information on air pressure settings
on a variety of pneumatic nailers. Tapered or bugle head fasteners are permitted when the heads are properly sealed
from moisture.
Nail heads, or any other dents, can be filled with exterior grade spackling putty specifically designed for filling nail holes.
Allow putty to dry, sand smooth with 100 grit sandpaper and spot prime before painting. Over time, spackling putty
may need to be replaced or touched up. For the best aesthetic appearance when using the smooth side of MiraTEC
trim, additional work is required. The nails should be set flush or slightly countersunk (not to exceed 1/8˝ ). Then apply
the spackling putty as outlined above. Reapply the putty as needed for desired appearance.
Use a nail that is appropriate to the style of construction. Do not use staples, braids, or t-nails.
GENERAL INFORMATION: MiraTEC Treated Exterior Composite Trim is an
engineered wood composite trim designed for use in both exterior and interior applications
where a non-structural smooth or wood grain textured blemish-free trim product is desired.
MiraTEC trim resists moisture, rot and termites.
APPLICATION INSTRUCTIONS
Patented
16'' O.C.
Framing
1/2'' min
Continuous
horizontal
flashing with
drip & 2˝ (min.)
overlaps
& joints
Siding
Window or door
head casing, water
table or other
horizontal trim
Gap 1/8''
Seal Joint
Double nail on both sides of butt joint
CORRECT
INCORRECT
16'' max
16˝ O.C.
Fascia Application
Rafter
Fascia
24" max
Sub-fascia is
recommended
in regions of
high humidity
or extreme
humidity changes.
CONDITION
Snug
Flush
=PZPISLÄILY
*V\U[LYZ\UR
ãã
*V\U[LYZ\UR
TVYL[OHUã
CONDITION
OK
OK
Paint
,_[LYPVYW\[[`
,_[LYPVYW\[[`
add nail
16'' O.C.
Framing
1/2'' min
Continuous
horizontal
flashing with
drip & 2˝ (min.)
overlaps
& joints
Siding
Window or door
head casing, water
table or other
horizontal trim
Gap 1/8''
Seal Joint
Double nail on both sides of butt joint
CORRECT
INCORRECT
16'' max
16˝ O.C.
Fascia Application
Rafter
Fascia
24" max
Sub-fascia is
recommended
in regions of
high humidity
or extreme
humidity changes.
Glue
Mitered
Edges
Rafters
Fascia
16"
max
MiraTEC 5/8˝
fascia requires
sub-fascia in
regions of
high humidity
or coastal areas.
5/8˝ Fascia Application