
Installation Guide
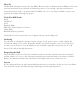


Ceiling
Floor
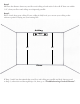
Step 7
Start applying two rows of planks to the wall along both sides of the starting line.
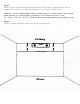
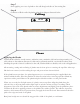
Step 8
Continue to fill the wall with planks using the techniques discussed below.
Applying the Planks
Timberchic® is thin for several reasons - minimize waste, maximize yield and most importantly, so it
will conform to the substrate. Because it is thin and a reclaimed material, care should be taken when
handling the product. Once it is adhered to the wall, Timberchic® is a durable, real wood wall application.
All measuring, cutting and test fitting of planks must be done prior to removing the tape film. After tape
film has been removed, avoid touching the tape and protect from dust and debris.
If the plank has an open knot, for optimal appearance we recommend using the supplied black dot
stickers behind the knot. Place the plank in its desired location before removing tape liner. Mark any
open knots with a pencil. Remove the plank and place black dot sticker over the pencil mark.
When you are ready for final placement of a plank, remove tape liner. Align the plank along the
reference line or adjacent plank with a slight angle so only the referenced edge is touching. Check
alignment of the ends of the plank, make necessary adjustments and lightly press the plank into place.
Confirm the fit before applying pressure to the plank with a rubber J-roller. The adhesive is pressure
sensitive, which means the more pressure that you apply, the better the bond. Extra attention shoud be
paid to the edges and ends of the plank.
Butt joints in adjacent rows should be staggered the width of the plank, at a minimum.