
Product Brochure


HOW-TO: ROOFTOP SNOW REMOVAL
Version 3.0 page
2
Reconfiguring Your SnowPeeler
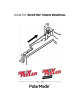
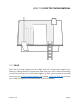
SnowPeeler is typically configured for ground level use with the frame adapter
attached to the bottom edge of the cutting frame. When using SnowPeeler from the
roof, the frame adapter is mounted on the upper edge of the cutting frame with the
pole handle facing the opposite direction of the vinyl slide.
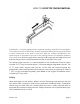
To configure SnowPeeler for the rooftop application, you must first uninstall the
frame adapter from the bottom surface of the cutting frame by unscrewing the (two)
¼-inch cap screws. It is not necessary to remove the frame pole from the frame
adapter.
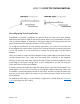
Next, you’ll want to install the frame adapter to the inside edge of the upper surface
of the cutting frame. First, make sure the frame pole is pointed in the opposite
direction of the vinyl slide. Next, position the flat surface of the frame adapter to the
inside edge of the upper cutting frame. In this configuration, you will be using the
outer two holes on the frame adapter.
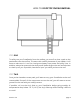
Screw the (two) cap screws through the cutting frame into the frame adapter and
hand-tighten. Use a 5/32-inch hex key to fully tighten. Before tightening make sure
the handle is positioned perpendicular to the frame. You will also want to make sure
that you do not over-tighten the screws, so you don’t strip the threads on the inside
of the adapter.
For additional information on the Rooftop configuration, please view our Assembly
Video (starting at the 8:15 mark)