
Installation Guide

Installation Instructions
LP® TechShield®
Radiant Barrier Sheathing
Basic Uses
LP
®
TechShield
®
Radiant Barrier Roof Sheathing installs just
like regular roof sheathing, so there are no additional labor
costs. But unlike conventional sheathing, LP TechShield
sheathing features a thin, durable layer of aluminum
laminated to our OSB roof sheathing. This creates a highly
effective radiant barrier. Because it helps block radiant
heat from entering a home, LP TechShield Radiant Barrier
Sheathing can reduce monthly air conditioning bills by up to
17%. That’s built-in savings that start immediately and will
last for years to come.
Climate Considerations
The benets of radiant barrier sheathing will vary by climate
and will have the most impact on reducing cooling costs
when used in warm climate regions that have signicant solar
radiation.
Condensation
Under certain conditions, moisture may condense on the
underside of roof sheathing. In most circumstances, any
condensation that forms will dissipate as the attic warms.
During extended cold weather, however, condensation may
form as frost and could accumulate. To minimize this, radiant
barrier sheathing should be installed in homes with well-
ventilated attics that have been properly air sealed to prevent
transfer of moist heated air from the living space to the attic.
Storage and Handling
Store LP TechShield panels in a clean, dry area. Do not
store in direct contact with the ground. Protect from
moisture prior to and during installation. Outside storage, if
necessary, requires panels to be covered with plastic sheets
or tarpaulins with the sides loosely covered to provide
adequate air ventilation.
Handle LP TechShield panels as you would other APA rated LP
sheathing products. Be careful not to drop on corners or crush
panel edges. Keep panels well supported and neatly stacked to
prevent warping. Use caution to avoid damage to the radiant
barrier foil surface.
Roof Sheathing Installation
•Placetheskid-resistantsideupwiththeAPAtrademark
stamp facing down and wear skid-resistant shoes when
installing the roof sheathing.
•Installwiththelongdimensionorstrengthaxisofthe
panel across supports and with the panel continuous over
two or more spans.
•Provide1/8˝minimumspaceatpanelendsandedges.Use
a spacer tool (i.e. 10d box nail) to assure accurate and
consistent spacing.
•Panelendjointsshalloccuroverframing.Staggerendjoints
in each succeeding row.
•Provideadditionalpanelstiffnessbyinstallingpaneledge
clips mid-span on all unsupported edges.
•Nail6˝o.c.alongsupportedpanelendsandedgesand12˝
o.c.atintermediatesupports.Fastenpanels3/8˝frompanel
edges.Use8dcommonnailsforpanelsupto1˝thickness.
Forpanelsover1˝use8dring-shankor10dcommonnails.
Other code-approved fasteners may be used.
•Coverroofsheathingassoonaspossiblewithroongfelt
or shingle underlayment for protection against excessive
moisture prior to roong. If any edge swelling occurs prior
to roof underlayment installation, all raised joints should
be sanded at.
•Allowsheathingtoadjusttohumidityandmoisture
conditions before shingle installation.
•Removewrinklesandattensurfaceofshingle
underlayment before installing shingles. High performance
shingle underlayment is recommended for better results.
•Heavierweightand/ortexturedshinglesarerecommended
to better mask imperfections in roong assembly.
NOTE:Checkwithyourlocalbuildingdepartmentbeforedecidingonan
installation method.
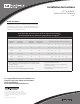
LP TechShield
foil side facing down
Wood Truss Roof System
Vaulted Roof System
3/4˝ min. air space
3/4˝ min. air space
3/4˝ min.
air space
Insulation
Roong
LPCorp.com
|