
Specification
1
1
1
1
1
1
1
1
1
1
1
1
1
1
1
1
1
1
1
1
1
11.
10. Заполните швы между панелями шпаклевкой PUFAS (Füll+Finish). После высыхания и усадки процедуру повторить, затем обработайте швы
шпаклевкой финишной Sheetrock.
12.
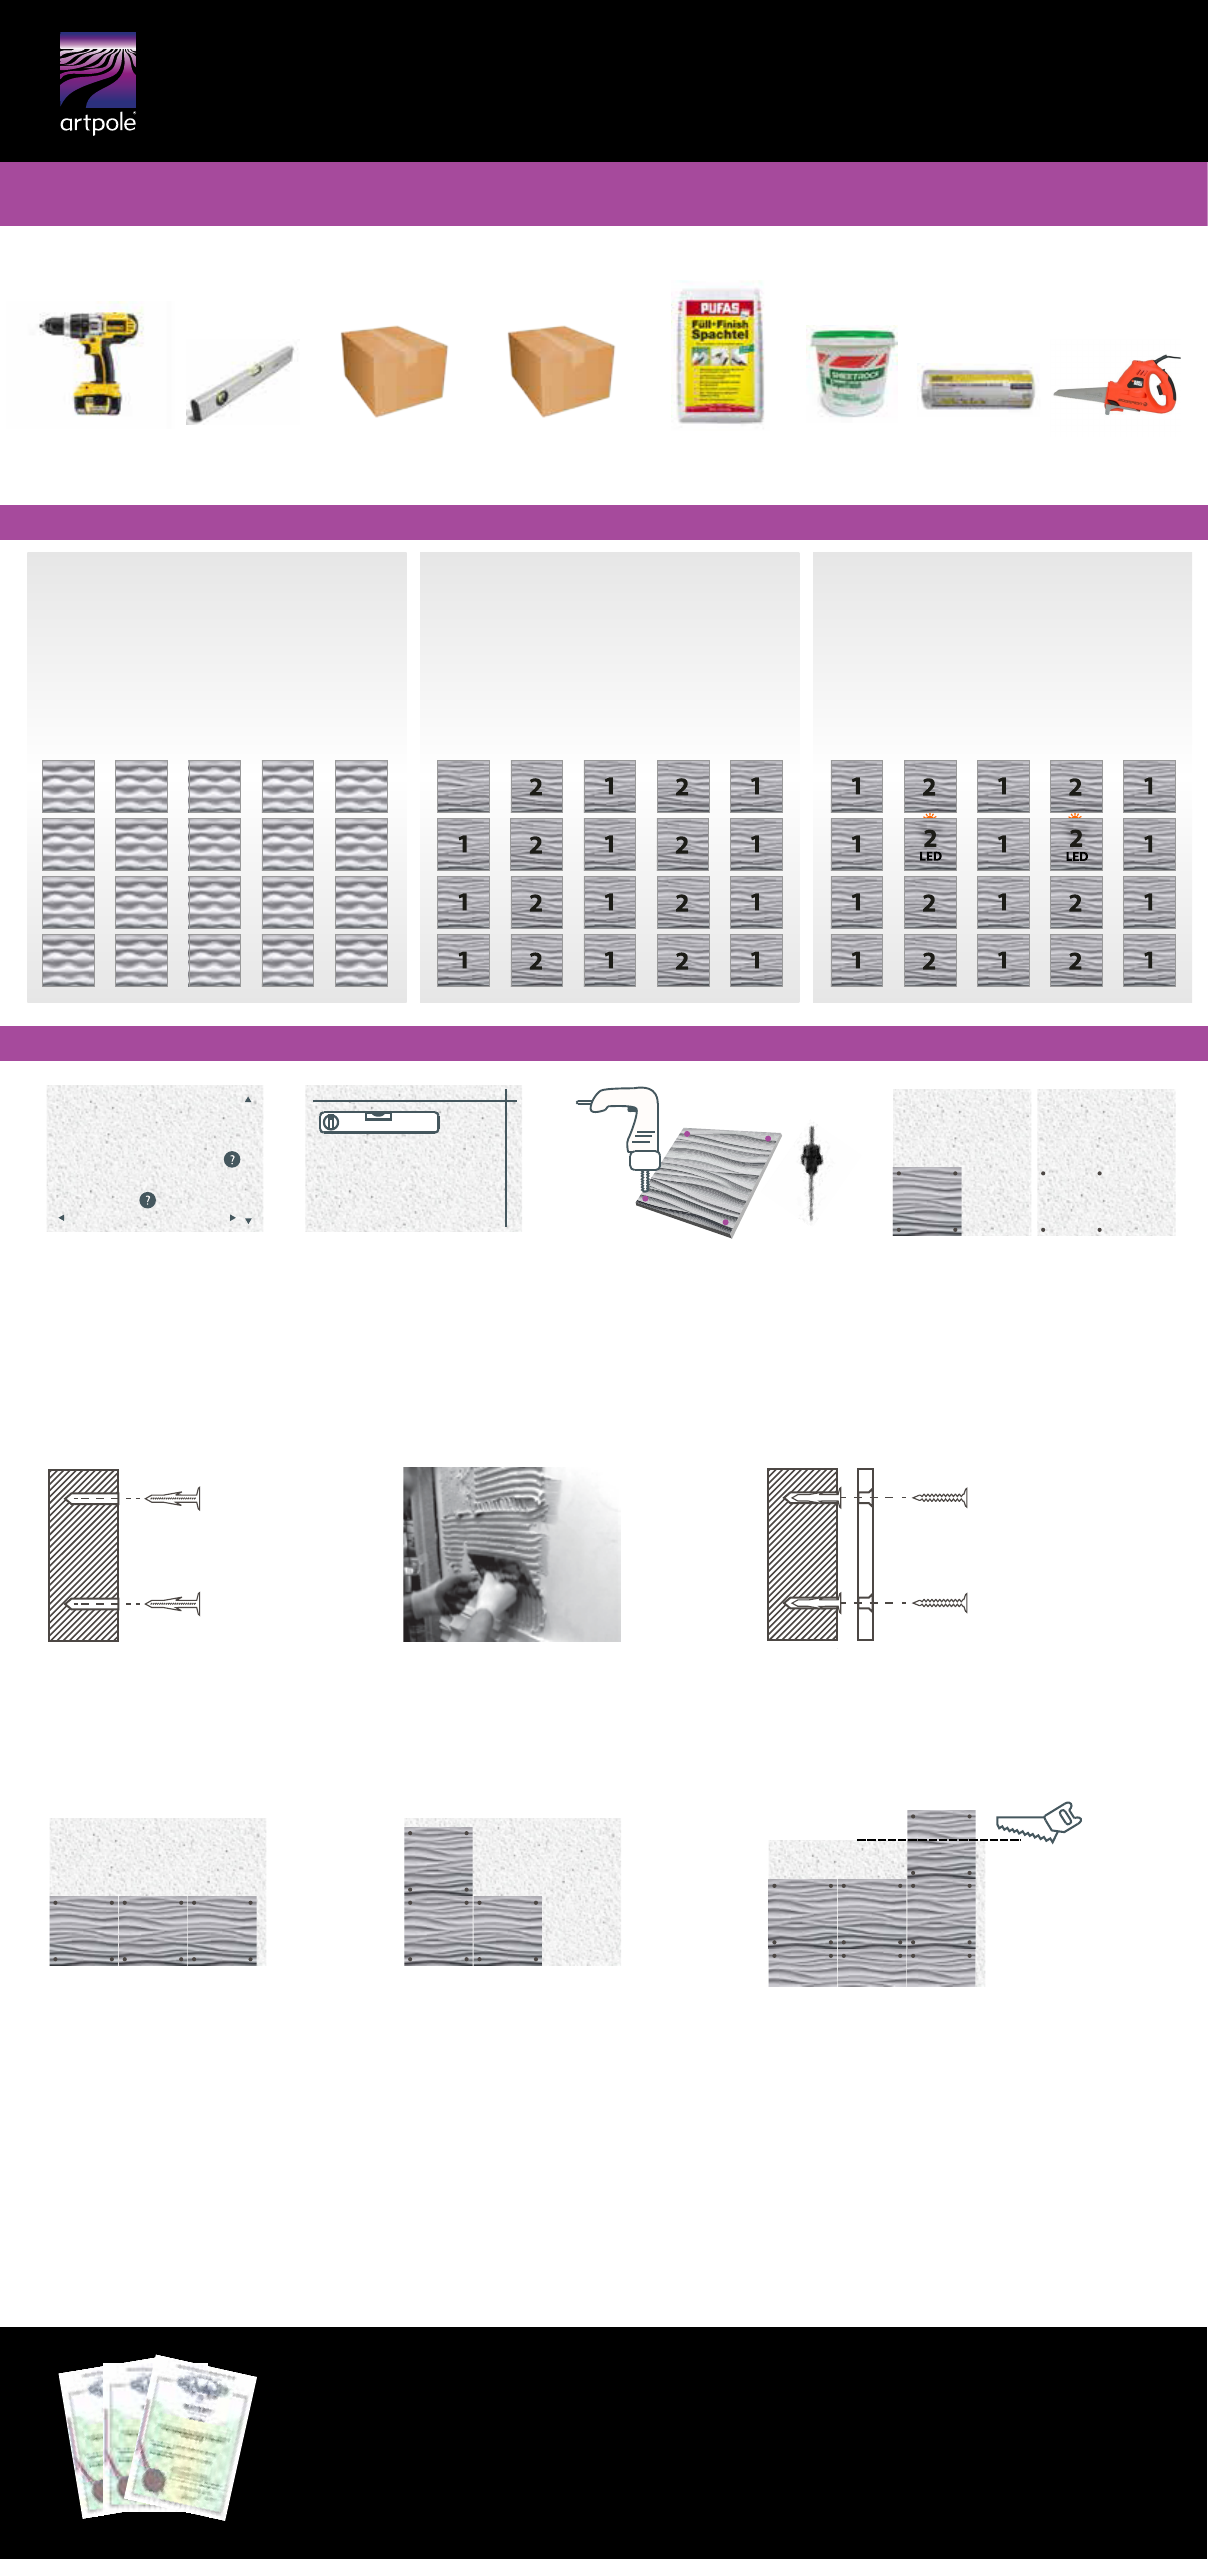
Tools and materials that you will need
ARTPOLE DESIGNS ARE PROTECTED BY PATENTS, COPYRIGHTS
AND BY LAW. MANUFACTURING OR TRAFFICKING OF COUNTERFEIT GOODS
SHALL BE LIABLE UNDER CIVIL AND CRIMINAL LAW OF THE RUSSIAN FEDERATION.
Finishing putty
“Sheetrosk”
Protective
lm
Gypsum lling putty
(Full+Finish)
Tools for installation
“Artpole”
LevelScrewdriver
Set of consumables
“Artpole” for 3 m2
шпаклевку гипсовую заполняющую
PUFAS (Füll+Finish)
Countersink
Подготовьте панель к монтажу,
просверлив четыре отверстия на
углах панели, отступив 3-5 см. от края
(в зависимости от дизайна панели).
Рекомендуем использовать зенкер из
набора инструментов “Артполе”, с
помощью которого одновременно
делаются фаски под “шляпки”
саморезов.
Убрав панель, просверлите отверстия по
отмеченым точкам. В готовые отверстия
вставьте пластиковые дюбеля. В случае
монтажа на стену из пеноблоков или ГКЛ
используйте специальные дюбеля дривы из
набора расходных материалов “Артполе”.
Electric saw
3D design wall panels
of non-combustible materials
MONO panels
DOUBLE panels Double panels with light
Arrangement of panels
Installation of panels
Instructions for installation of gypsum panels
The simplest type of installation. All panels
are identical and are mounted next to each
other, creating a continuous composition.
A unique type of panel that allows to embed
LED lamps directly into the wall. Installed as
well as the usual double panels. When you
want to use the lightbar, it is simply mounted
in place of the #2 panel.
This type of panels forms an integral gure
only when integrating two panels #1 and #2.
This allows to make the texture on the wall
with fewer repetitions. Prior to the purchase
and installation of these panels calculation of
the number of panels #1 and #2 is required,
since their number may not be equal.
1 Conduct measurements
of the walls to determine
the number of panels
horizontally and vertically.
5 Removing the panel, drill holes at the marked
points. In the nished holes, insert the plastic
dowels. In the case of mounting at the wall of foam
blocks or plasterboard use special dowels “Driva”
from the set of consumables "Artpole."
8 Installation is possible in two ways: a) horizontally; b) by “ladder”. It is more
convenient to begin the installation from the lower left (right) edge of the wall. When
mounting it is necessary to keep the distance between the panels 1-1.5 mm, this can
be achieved using a cardboard rulers with a certain thickness. Further the seams are
wiping with a gypsum putty, if necessary further nal processing is allowed.
10 Fill the joints between the panels with the putty (Full + Finish). After drying and shrinkage, repeat the procedure, then treat the joints with the
nishing putty “Sheetrock”.
11 After all seams are wiped and the putty is dried, treat roughnesses with a ne-grained sandpaper.
12 The panels are ready to be painted and, if necessary (depending on the choice of the nal coating) before painting the surfaces of panels can be
primed. Painting can be done by spray gun, roller or brush.
9 If the remaining section of the wall is not the same
as the size of the panel, it is necessary to measure the
rest of the site and saw o the desired size of the panel
with the electric saw.
6 On the section of the wall,
where it is supposed to install
the panels, apply gypsum
lling putty (Full + Finish)
7 Place the panel to the wall, aligning the holes
in the plate with the holes on the wall and fasten
with screws. Continue installation of panels
horizontally, combining drawing, and then
proceed to the next row.
2 Using a laser or
conventional building level,
determine the ideal
horizontal and vertical
lines, mark them with a
pencil.
4 Place the rst panel to the site of
the wall where you want to start the
installation. Through the made holes
in the panel make pencil marks to
be visible on the wall.
3 Prepare a panel for installation, drill
four holes in the corners of the panel,
retreating 3-5 cm from the edge
(depending on the design of the panel).
We recommend to use countersink from
the set of tools “Artpole” with which
chamfers under the cap screws can be
made simultaneously .
Attention! Screw must pull the plate
to the wall without excessive force
a) horizontally
b) by “ladder”