
Instructions / Assembly


IMPORTANT INSTALLATION INSTRUCTIONS
1. Shut off main water supply. Drain water from water lines.
2. Remove housing from filter head and set aside.
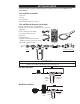
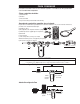
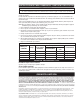
3. WrapPTFEtapearoundthe1”malecompressionadaptors(totheright,see
Figure 1) and screw firmly to filter head. Do not use pipe solvent (dope) as
some types may cause damage to plastic fittings. Do not overtighten as it
may cause damage to filter head. Damage to unit may result in property
damage due to water leakage.
4. Calculate proper spacing of components. Measure distance and mark pipe accordingly.
5. Cut pipe to length with pipe cutter.
6. Fitfilterheadandballshut-offvalveontopipe.Makesurethe“IN”portwithredairreleasebuttonisconnectedto
water supply line. Tighten compression nuts.
7. Remove o-ring from housing. Lubricate with a water based lubricant and seat securely on housing.
8. Place filter into housing. Screw housing with filter onto head.
9. Slowly turn on main water supply. Press red air release button (on filter head) to expel air.
10. Check for leaks then turn water with an open faucet for 5 minutes or until air is flushed from system.
CAUTION
WARNING
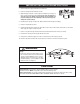
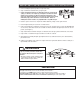
To reduce the risk associated with hazardous
voltage:
•Ifthehomeelectricalsystemrequiresuseof
thecoldwatersystemasanelectricalsafety
ground,ajumpermustbeusedtoensurea
sufcientgroundconnectionacrossthelter
installationpiping—referinstallationtoquali-
edpersonnel.(seeFigure2)
To reduce the risk associated with property damage due to water leakage:
• Read and follow Use Instructions before installation and use of this system.
• Installation and use MUST comply with all state and local plumbing codes.
• Protect from freezing, remove filter cartridge when temperatures are expected to drop below 40°F (4.4°C).
• SHUT OFF FUEL OR ELECTRIC POWER SUPPLY TO WATER HEATER after water is shut off.
Ground Wire
Ground Clamp Ground Clamp
Figure 2
Figure 1
4