
False Tread Instructions


Page 2
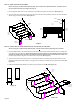
the open side of the stair. (See Figure 5c page 4.)
1. Fit and install the false risers on the closed side of the stair using glue and nish nails.
2. Cut a 45º miter on all false risers for the open side of the stair Fit and install the risers on the open side of the
stair using glue and nish nails.
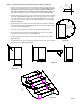
Closed
Side of
Stair
Closed
Side of
Stair
Skirtboard
Open
Side of
Stair
False Riser
Mitered
False Riser
Skirtboard
H
G
H
G
Subriser
Subtread
False Tread
for Closed
SIde of Stair
Closed
Side of
Stair
Skirtboard
Subtread
Subriser
Skirtboard
Open
Side of
Stair
M
L
L
G
Mitered
Skirtboard
H
Mitered
False Riser
False Riser
Top
View
Skirtboard
Drywall
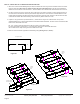
: If using the LJ-8010-2 False Starting Step, read all of Part 5 before beginning this procedure.
1. Place the false treads on the closed side of the stair and mark the length needed from the face of one false riser
to the face of the next false riser. : Always place the false tread on the stair with the non-grooved edge
towards the middle of the stair. Also note that the tread has a Bottom side as indicated with a stamp. Cut
and t the false treads to length for the closed side of the stair .
2. Cut the miter from both ends of the 9" piece of moulding trimming the moulding to t the false tread Fit and
install the moulding to the false treads using glue. Be sure that the moulding remains square to the tread.
3. Install the assembled false treads to the stair using glue and nish nails M.