
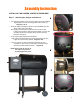
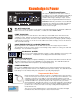
Instructions / Assembly


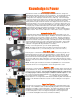

13
Assembly Instructions
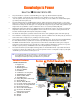
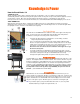
INSTALLING THE “ARCHED FLAME BROILER”:
To ensure proper height, the bottom of the mounting bracket (A)
should not be within the pellet drop chute area.
If you do need to adjust the bracket, loosen off the 2 (two)
Phillips screws, lift the bracket and re-tighten the screws.
Take th
e Arched Flame Broiler ( C) and hold it so that the end with
the cut out and slots is in your left hand. The plate then clips
easily over the adjustable mounting bracket. (B)
Take the Arched Flame Broiler Cover Plate (D) and place it on
top of the main piece ( C). This plate is used to slide
over the flame broiler opening, to open or close “Diirect”
flame searing.
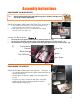
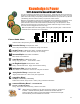
INSTALLING THE HANDLE:
Tools Required:
9/16” Wrench
Insert one scew through the hole provided in the barrel
Install the LARGE Decorative Washer, then the
smaller washer on the screw end sticking through the
barrel.
Hand thread and tighten this screw to one of the ends
of
the one piece stainless steel handle. .
Follow the same procedure to secure the other end of the handle to the barrel.
Using a screw driver firmly tighten both bolts until handle feels firm.
CAUTION! DO NOT OVERTIGHTEN! Only a snug fit is required.
INSTALLING THE THERMOMETER:
The thermometer comes complete with its own threaded nut
already installed on the thermometer.
Simply spin off the threaded nut and small washer.
Insert the Dome thermometer, along with the large finiishing washer as
well as the protective felt, through the hole provided in the top of the
hood,
•
Then firmly hand tighten the nut back onto the thermometer.
Handle
Phillips Screw Driver
Cordless Drill
& Phillips Bit
A
D
Large Decorative
Washer
Small Washer
#250 5/8"
Machine Screw
Dome Thermometer
Large Protective Felt
Large Finishing Washer
Washer & 9/16” Nut
•