
User manual


These operating instructions are published by Conrad Electronic SE, Klaus-Conrad-Str. 1,
D-92240Hirschau(www.conrad.com).
Allrightsincludingtranslationreserved.Reproductionbyanymethod,e.g.photocopy,microlming,
orthecaptureinelectronicdataprocessingsystemsrequirethepriorwrittenapprovalbytheeditor.
Reprinting,alsoinpart,isprohibited.
These operating instructions represent the technical status at the time of printing. Changes in
technologyandequipmentreserved.
© Copyright
2013
by Conrad Electronic SE.
V1_0813_02-TS
Frost Protection
• Theheatwaveheaterisequippedwithafrostprotectionguard.
• Connectthepowerplugtoanoutlet.Turnthethermostatdial(7)toposition
.Assoonastheroom
temperaturesinksbelowapprox.+5°C,theheatwaveheaterturnsonautomatically.
Tip and Overheating Protection
Tip Protection
Theunitisequippedwithatipprotection,whichautomaticallyshutsofftheheatingfunction,iftheunithas
tippedover.Assoonastheunitstandsuprightagain,theheatingfunctionisreactivated.Securetheunitto
preventaccidentaltipping.
Overheating Protection
Theheatwaveheaterisequippedwithanautomaticshut-off.Shouldtheprotectivescreen(9)beobstructed,
forinstance,orifthetemperatureexceeds+130°C,theautomaticshut-offisactivated.Tostarttheheat
waveheateragain,proceedasfollows:
1. Turnthe0 1 2switch(2)toposition0,andturnthethermostatdial(7)counterclockwisetoposition
(Off).
2. Pullthepowerplugoutoftheoutletandallowtheheatwaveheatertocooltoroomtemperature.
3. Important!Findoutwhytheheatwaveheatershutoffautomatically.Ifthecauseremainsunknown,
contactaqualiedtechnician.
4. Onceyouhaveremediedthecausefortheautomaticshut-off,youcanusetheheatwaveheateragain.
Maintenance and cleaning
Neveruseaggressivecleansersorchemicalsolvents.Theymightdamagethehousingand
impairthefunctioningoftheunit.
Donotpresstoohardonthesurfaces,asthismayleadtoscratchesordents.
• Exceptforanoccasionalcleaning,theunitismaintenancefree.
• Turntheunitoffbeforecleaning,andpulltheplugfromthesocket.Allowtheunittocooloffsufciently.
• Useadry,softandcleanclothtocleantheunit.
• Removedustfromtheprotectivescreen(9)usingalongbristled,softandcleanbrush,orahoover
Disposal
Electronicdevicesarerecyclablewasteandmustnotbedisposedofinthehouseholdwaste.
Attheendofitsservicelife,disposeoftheproductaccordingtotherelevantstatutoryregulations.
Youthusfullthelegalrequirementsandmakeyourcontributiontoprotectingtheenvironment.
Technical data
Operatingvoltage..........................230V/AC,50Hz
Protectionclass.............................IP24
Powerconsumption.......................max.1000W(BN671575)
.......................................................max.1500W(BN671577)
PowerlevelswitchI.......................650W(BN671575)
.......................................................900W(BN671577)
PowerlevelswitchI+II.................1000W(BN671575)
.......................................................1500W(BN671577)
Suitableforroomsupto................15m
2
(BN671575)
.......................................................20m
2
(BN671577)
Cordlength....................................175cm
Dimensions(WxHxD)................approx.570x420x80mm(BN671575)
.......................................................approx.775x420x80mm(BN671577)
Weight...........................................4.4kg(BN671575)
.......................................................5.4kg(BN671577)
Assembly
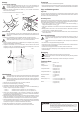
a) Install track roller mounts
Iftheproductisusedasaoormounteddevice,itmustbeoperatedwiththetrackrollermounts
andtrackrollers(10).Usethehandle(1),tocarryandmovetheunit.Attention!Donotmove
theunitwhilehot.
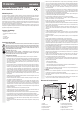
1. Installbothtrackrollermountswithrollers(10)attheundersideoftheheatwaveheater.Pleaserefer
tog.1.
2. Theunitiscompletelyassembledandreadytotheuse.
Fig.1
1
2
Fig.2
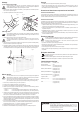
b) Wall Installation
Ifthetrackrollermounts(10)havealreadybeeninstalledontheheater,unlockthetrackroller
mountblockandremovetherollermount.Pleaserefertog.2.
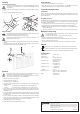
1. Securethewallmounttothewallwiththescrewsandwallplugsprovided.
Installtheheatwaveheateratleast0.6mabovetheoor.Makesuretoleaveatleast1mof
unobstructedspaceinfrontoftheunit.
2. Turnbothlocksofthewallmounttotheopenposition(vertically).Fastentheheatwaveheatertothe
wallmount
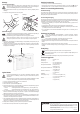
3. Locktheheatwaveheatertokeepitfromfallingoff.Todothis,useascrewdrivertoturntheleftlock90°
counterclockwiseandtherightlockclockwise.Pleaserefertog.3.
Fig.3
Operation
Whenusing theunitfortherst time,heatedpartsofthe housingmight emitatemporary
nuisanceodour.Shouldthishappen,airtheroomwheretheunitissetup.
Placetheunitonasufcientlylarge,stable,heatresistantandlevelsurface.Makesurethe
productcannotrollawaybyitself(notincaseofwallinstallation).
1. Makesurethe0 1 2switch(2)isinposition“0”.
2. Turnthethermostatdial(7)toposition
.
3. Connectthepowerplugtoasuitableoutlet.
4. Turntheunitonbypressingthe0 1 2switch(2).Theoperatinglight(6)comeson.Thefollowingpower
settingsareavailable:
- Position“1” Heatingfunctionwithmax.650W(BN671575),max.900W(BN671577)
- Position“2” Heatingfunctionwithmax.1000W(BN671575),max.1500W(BN671577)
5. Turnthethermostatdial(7)allthewayclockwise.Theindicatorlight(4,5)lightsupassoonasthe
heatingfunctionisactivated.Inposition“2”,bothindicatorlightscomeonsimultaneously.Theheatwave
heaterbeginstoheatup.
6. Assoonasthedesiredroomtemperatureisreached,turnthethermostatdial(7)slowlycounterclockwise
tothedesiredposition.Desiredpositionmeansatemperaturesettingthatiscomfortableforyou.Find
thepositionbytrying.
7. As soon as the selected temperature is reached, the thermostat temporarily shuts off the heating
function.Inthiscase,theindicatorlight(4,5)goesoff,andtheoperatinglight(6)lightsup.Oncethe
temperaturehasgonedownapproximately+3°C,theheatfunctionisreactivated.
8. Movethe0 1 2switch(2)to“0”toturnofftheunit.
9. Disconnecttheplugfromtheoutletwhentheunitisnotinuse.