Premier Railing & Stair Kit Assembly and Installation Instructions PLEASE READ OWNER'S MANUAL COMPLETELY BEFORE ASSEMBLING YOUR RAILING KIT. 34106887BOM V5 5/13 Models 73012442 / 73012443 / 73012444 73012445 / 73012446 / 73012447 73012448 / 73012449 / 73012450 73012451 / 73012452 / 73012453 73013195 / 73013180 / 73013183 73013181 / 73013178 / 73013179 73012454 / 73012455 / 73012456 73012457 / 73013184 / 73013182 Owner's Manual Version 5.
Please read these instructions carefully before installing your Barrette railing. If you have any questions or issues installing the railing, please contact us at 1-800-336-2383 for assistance. Before You Begin… Check your local zoning laws. • Local zoning laws and Home Owners Associations may regulate the location, style and height of your fence or even require a permit signoff beforehand.
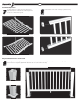
4 Cut Rails to Length Use 2" screws to attach top bracket dovetails. Screws must penetrate the steel insert (if using steel surface mount). Use 1 1⁄4" screws to attach bottom bracket dovetails. 5 Place bottom rail across post opening leaving equivalent spacing from the last baluster and post on each end. Mark 1/2" from end of post to allow room for bracket width and expansion.
Assemble Railing Section 7 Lay bottom rail on a clean smooth surface and snap balusters into routed holes. Then repeat the process to connect the top rail. 8 Slide brackets onto ends of rails (top and bottom). Hang Assembled Rail Section onto Dovetails 9 For railing sections using aluminum balusters the installer will have to carefully hold top and bottom railings together to make sure section does not separate.
10 Install four 2" screws though the bottom of the top rail brackets into handrail. Pre-drill all four holes with a 5/32" drill bit. Install the first two screws straight (90 degrees) through the pre-drilled holes in the bottom of the bracket. Install the next two screws at 45 degrees through the brackets into the post, starting with the dimples on the bottom of the top rail bracket. 11 For angled rail installation other than at 90 degrees or 180 degrees, purchase left to right angle brackets.
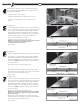
4 Measure angle – take rail to chop saw and measure angle. Set saw and record angle. (NOTE: Do not cut here. This is for acquiring measurements.) • If angle is 31-33°, then go to Step 5 • If angle is <31°, then skip Step 5 and proceed to Step 6 • If angle is >33°, then skip Step 5 and 6, and proceed to Step 7 5 For angles 31-33° • From the original line created by the post, mark another line 11/16" on the inside of the bottom rail (closer to the baluster routes).
8 Place top rail flat on table as shown. Lay the cut bottom rail on top of the top rail, with the routed holes facing in the same direction. Line up the routes. Bottom Rail Bottom Rail Top Rail Top Rail 9 Mark the top rail (using the bottom rail and a steel rule as a guide) to the top edge of the rail as shown by the arrows. Make sure to extend the line out at the angle to the edge of the rail (mark line on "bump" of bottom of top rail on angle, not straight down).
10 Place brackets on bottom rail, securing with 2 screws per bracket (#10 x 1") as shown. Then, place brackets on top rail, securing with 1 screw per bracket (#10 x 1") as shown. BOTTOM RAIL 11 TOP RAIL Set chop saw to stair angle and carefully cut all four brackets as shown. Be particularly careful to cut from the proper side of the bracket, depending on your angle. Cut smallest amount of bracket possible to get the correct angle on bracket (feather to edge).
12 Assemble your stair railing section a. Lock tabs on baluster/spindle must face outer edge of routed holes in rails. b. Assemble your stair section by snapping balusters/spindles in rails. Lock tabs Outer edge holes c. Place brackets on ends. d. Place assembled stair rail between posts on spacer board. 13 14 Make sure rail brackets are centered on posts. Drive two (#10x2") mounting screws into brackets and into posts, starting with the bottom rail. Repeat for each bracket.
Transferable Limited Lifetime Warranty What is covered: Barrette Outdoor Living warrants vinyl and aluminum products to include; vinyl and aluminum fence, vinyl and aluminum railing and plastic lattice against defects or workmanship for as long as you own your home. Barrette Outdoor Living will at its option replace the product in question with new product of the same or equivalent value at no charge.