
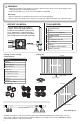
Installation Guide


4
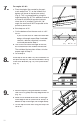
5.
6.
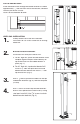
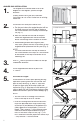
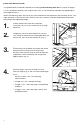
Cut Rails to Length:
Place bottom rail across post opening leaving
equivalent spacing from the last baluster and
post on each end (Fig. 5). Mark
1
⁄
1
⁄
1
2
⁄2⁄
" from end
of post to allow room for bracket width and
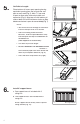
expansion (Fig. 6). Align top rail with bottom rail
and cut both rails with miter box or hacksaw (See
blade manufacturer's specs for correct blade) (Fig. 7).
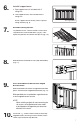
NOTE:
• You will have to cut through an aluminum
insert in the top rail of an 8' section.
• Prior to installing round aluminum
balusters, insert the provided foam strip
into the top of the top rail and bottom of
the bottom rail
(sides opposite of routed holes).
• Cut foam strip to rail length.
•
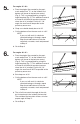
DO NOT REMOVE THE RELEASE PAPER
FROM ENTIRE STRIP! ONLY
remove 1"
FROM ENTIRE STRIP! ONLY remove 1" FROM ENTIRE STRIP! ONLY
of the release paper from each end of the
foam strip to expose adhesive (Fig. 8).
• Press the foam strips onto rails (Fig.9).
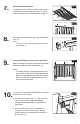
Install 3" support brace:
a. One support brace is included with 6'
railing kits.
b. Two support braces are included with 8'
railing kits.
Install support braces evenly across span of
railing section (Fig. 10).
Fig. 5
Fig. 6
Fig. 7
3" Support Brace
Fig. 10
Press
Onto Rail
Fig. 9
Release Paper
Top
Bottom
Foam
Strip
Fig. 8