
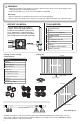
Installation Guide

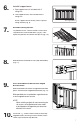

8
This guide outlines installation methods for installing
Premier Railing Stair Kits
in a variety of angles.
It is very important to identify the angle of your stairs, as the installation methods vary depending on
what angle the stair is.
Within the following steps, be sure to pay close attention to the placement and utilization of the "stair
angle template" to ensure you mark and cut your rails correctly, and note orientation of all brackets
and railing in the supporting images.
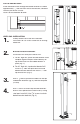
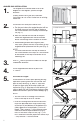
1.
2.
3.
4.
Closely follow Post Install Kit installation
instructions or use a Post Jacket on an existing
wood 4x4.
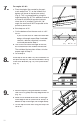
Temporarily secure a deck board (5/4") to your
stair treads to determine the spacing between the
nose of the stairs and your bottom rail (Fig. 1).
Place bottom rail on board and center the routes
between posts making sure to leave equal
distance from baluster route to post on both top
and bottom. Mark the bottom rail using inside
edge of posts (Fig. 2).
Measure angle – take rail to chop saw and
measure angle (Fig. 3). Set saw and record angle.
NOTE:
Do not cut here. This is for acquiring
measurements.
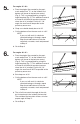
• If angle is 31º-33°, then go to Step 5
• If angle is <31°, then skip Step 5 and proceed
to Step 6
• If angle is >33°, then skip Step 5 and 6, and
proceed to Step 7
Temporary
Temporary
Temporary
Temporary
Temporary
Temporary
Deck Board
Deck Board
Deck Board
Deck Board
Deck Board
Deck Board
Deck Board
Deck Board
Deck Board
Temporary
Temporary
Temporary
Temporary
Temporary
Temporary
Deck Board
Deck Board
Deck Board
Deck Board
Deck Board
Deck Board
Deck Board
Deck Board
Deck Board
Bottom Rail
Bottom Rail
Bottom Rail
Bottom Rail
Bottom Rail
Bottom Rail
Bottom Rail
Bottom Rail
Bottom Rail
Bottom Rail
Bottom Rail
Bottom Rail
Fig. 1
Fig. 2
Fig. 3
Temporary
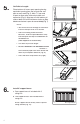
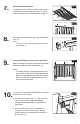
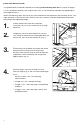
STAIR RAIL INSTALLATION: