
Use and Care Manual


8
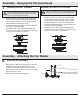
Assembly - Close-To-Ceiling Mount
Assembly - Hanging the Fan
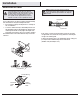
Attaching the fan to the electrical box
□ Pass the 120-Volt supply wires through the center hole in the
mounting bracket (A).
4
WARNING: To reduce the risk of re, electric shock, or other
personal injury, mount the fan to an outlet box or supporting
system marked acceptable for fan support, and use the
mounting screws provided with the outlet box.
A
JJ
JJ
OO
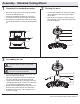
Preparing for close-to-ceiling
mounting
Routing the wires
1 2
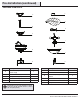
□ Remove the canopy ring (L) from the canopy (C) by turning the
ring to the right until it unlocks.
□ Remove the mounting bracket (A) from the canopy (C) by
loosening the four screws (SS) on the top of the canopy (C).
□ Remove the two non-slotted screws and loosen the slotted
screws.
□ Remove the decorative canopy bottom cover (N) from the
canopy (C) by depressing the three studs.
□ Remove three of the six screws and lockwashers (II) (every
other one) securing the motor collar (M) to the top of the fan
motor housing (D).
□ Route the wires exiting the top of the fan motor assembly (D)
through the rubber gasket (HH), canopy ring (L) and ceiling
canopy (C) (make sure the slot openings are on top); place
the rubber gasket (HH) over the remaining three screws, then
proceed to place the ceiling canopy (C) over the motor collar
(M).
□ Align the mounting holes with the holes in the motor (D) and
fasten, using the three screws and lockwashers (II) removed
previously. Tighten the mounting screws securely.
C
HH
D
II
L
M
N
C
A
SS
L
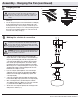
WARNING: To avoid possible electrical shock, turn the electricity
off at the main fuse box before wiring. If you feel you do not have
enough electrical wiring knowledge or experience, contact a
licensed electrician.
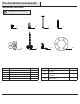
□ Install the ceiling mounting bracket (A) on the outlet box (OO) by
sliding the mounting bracket (A) over the two screws (JJ) provided with
the outlet box (OO). If necessary, use leveling washers (not included)
between the mounting bracket (A) and the outlet box (OO). Note that
the at side of the mounting bracket (A) is toward the outlet box
(OO). When using close-to-ceiling mounting, it is important that the
mounting bracket (A) be level.
□ Securely tighten the two mounting screws (JJ).