
Use and Care Manual

Page 6 of 7
CAUTION
Risks of burns. Do not operate the unit without the protective glass guard completely attached.
ALWAYS CONSULT A QUALIFIED CONSTRUCTION
PROFESSIONAL WHEN MAKING MODIFICATIONS TO ANY WALL
Materials
Whether you are building a new structure, or building the unit into an existing structure, the entire
construction must be built out of non-flammable materials.
Clearance
The opening should be a minimum 24’’ above the surface of the burner and 12’’ wider than the
external dimensions of the unit. This means a space of 24’’ above the surface of the installed burner,
and a minimum of 6’’ on either side of the burner. The depth of the opening should also be a
minimum of 12’’ to ensure at least 6’’ of space behind the burner.
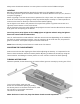
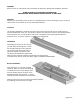
Installation
Depending on the size of your burner,
you will need a matching slot to insert
the overflow and burner into position.
The overflow has two support lips ‘D’
which will support the burner in the
slot where you would like it positioned.
Make sure the overflow container fits perfectly into the opening.
It should not be able to move from left to right or forwards and backwards.
Burner Installation
Place the burner ‘G’ into the overflow
container. Make sure the burner opening
is towards the front of your design, and
that the shutter plate ‘B’ is closer to the
backside and that the trap door ‘C’ opens
towards the back as shown in the illustration.
Make sure the burner shutter opens and closes smoothly
by following the instructions on page 4.