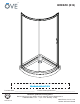
BREEZE (B14) An installation video guide can be found on our Youtube channel. Purchase date: _________________________ 2017-01-13 Product Tracking Reference: ________________________ Questions, problems, missing parts? Before returning to your retailer, call our customer service department at 1-866-839-2888, 9 a.m. - 5 p.m.
SAFETY INFORMATION CAUTION Please carefully read the following important safety information before handling or installing this shower. There is a risk of serious injury while handling this product. To minimize these risks, please note: • Always wear safety glasses and gloves while handling. • Always read and follow all the steps in the installation instructions. • Inspect all contents and glass for damage before installation.
TABLE OF CONTENT PACKAGE CONTENT..........................................................................................................................................4 HARDWARE CONTENT......................................................................................................................................6 TOOLS REQUIRED.............................................................................................................................................7 SHOWER REVERSIBILITY...........
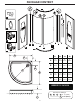
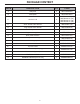
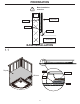
PACKAGE CONTENT C H I J 10 K A M L A F B E D M N C D A B E A G D B 31 34 36 38 32” 815mm 34” 865mm 36” 915mm 38” 965mm 32 7/8” 35” 40 3/8” 44 1/2” 835mm 890mm 1025mm 1130mm C 5 1/8” 5 1/8” 5 1/8” 5 1/8” 130mm 130mm 130mm 130mm D 7 7/8” 6 7/8” 12 3/8” 11 3/4” 200mm 175mm 315mm 300mm 36 1/8” 39 1/4” 46 3/4” 51 7/8” E 918mm 996mm 1187mm 1318mm BREEZE 31/34/36/38 Dimensions variations A C 4 B D E ± 1/8 “ (3mm) C ± 1/4 “ (6mm)
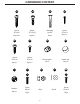
PACKAGE CONTENT PART# DESCRIPTION QTY CODE A Wall jamb 2 99STR1043-AC B Fixed panel 1 99SG10018-AC C Aluminum rail 2 99STR1033-AC (31) 99STR1034-AC (34) 99STR1035-AC (36) 99STR1036-AC (38) D Short vertical water defector 1 99SRU0057-AC N Long vertical water defector 1 99SRU0058-AC E Door panel 1 99SG00021-AC F Magnetic door gasket 1 99SRU0059-AC G Door panel extrusion 1 99STR1037-AC H Fixed panel moulding 2 99SRU0060-AC I* Retaining clip 2 99SGC1030-AC J* Door ha
HARDWARE CONTENT AA BB CC DD Screw ST4×45 Screw ST3.5×25 Wall plug ø6×30 Screw ST4×14 Qty.12+2 Qty.8+1 Qty.8 Qty.2+1 EE FF GG HH Screw ST4×12 Screw ST4×13 Door bumper Screw cap Qty.2+1 Qty.6+1 Qty.2 Qty.14 II JJ Washer Screw M4×16 Qty.14 KK Qty.9 LL Qty.18 MM Screw ST4×12 Qty.6 Qty.
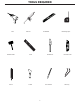
TOOLS REQUIRED Drill Silicone Rubber mallet Level Pencil Trowel 1x3 Battens Screwdriver 3/16” Drill bit 7 Measuring Tape Precision knife Allen key
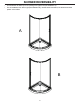
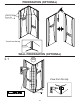
SHOWER REVERSIBILITY • This instruction is drawn up for an opening from right to left (see illustration A). • For an installation from left to right (see illustration B), use the same instructions, but switch around the panels: mirror effect.
PREPARATION ! Base installation overview Studs Acrylic Wall Dry Wall Batten Flange Silicone Shower Base BASE INSTALLATION 1.
PREPARATION (OPTIONAL) Remove the layer film View from the top SILICONE WALL PREPARATION (OPTIONAL) 2.
WALL PREPARATION (OPTIONAL) 2.2 LL View from the top 9X SILICONE JJ KK 2.3 Have the walls leveled with the base in order to have a small and constant gap between those two.
WALL PREPARATION (OPTIONAL) 2.
WALL PREPARATION (OPTIONAL) 2.5 2.6 ADHESIVE if s é h d A 22X f hé si Ad sive he Ad NAIL A d h e s iv e Optional step 2.7 Helpful Hint Add silicone on top of acrylic wall. MM 6X WARNING! Make sure to apply pressure on the shower walls surface where glue has been applied.
FRAME ASSEMBLY 3.1 C BB H 8X B G H C FRAME ASSEMBLY (CONT.) 3.
FRAME ASSEMBLY (CONT.) 3.3 D GG 2X EE FRAME POSITIONING 4.
FRAME POSITIONING (CONT.) 4.2 FRAME POSITIONING (CONT.) 4.3 4.
FRAME POSITIONING (CONT.) 4.5 8X *Only for ceramic wall 4.
FRAME POSITIONING (CONT.) 4.7 8X 5.
DOOR INSTALLATION 5.
DOOR INSTALLATION (CONT.) 5.
CAULKING 24 H ATTENTION ! Silicone sealing must be only applied on the outside of the shower to prevent leaks.
OVE Decors ULC LIMITED Product Warranty OVE is a distributor of the following Products: • Shower Doors (warranty period 5 years). • Acrylic Surfaces (warranty period 5 years against blistering, cracking or chipping in the acrylic surface). • Acrylic Shell Structure (warranty period 5 years against loss of water through fiberglass laminate of the acrylic body).
BREEZE (B14) Un guide d’installation video est disponible sur notre chaîne Youtube. Date d’achat: _________________________ Référence de suivi de produit: ________________________ Questions, problèmes, pièces manquantes? Avant de retourner cet article chez votre détaillant, appelez notre service à la clientèle au 1-866-839-2888, de 9 h à 17 h, heure de l’Est, du lundi au vendredi.
INFORMATION SUR LA SÉCURITÉ AVERTISSEMENT Veuillez lire attentivement les importantes consignes de sécurité suivantes avant la manutention et l’installation de cette douche. La manipulation de ce produit présente un risque de blessure grave. Pour minimiser ces risques, veuillez prendre note de ce qui suit: • Toujours porter des lunettes et des gants de sécurité pendant la manutention. • Toujours lire et suivre toutes les étapes indiquées dans les instructions d’installation.
TABLE OF CONTENT CONTENU DE L’EMBALLAGE..........................................................................................................................26 CONTENU DE LA QUINCAILLERIE...................................................................................................................28 OUTILS REQUIS................................................................................................................................................29 CETTE DOUCHE EST RÉVERSIBLE ...............
CONTENU DE L’EMBALLAGE C H I J 10 K A M L A F B D C E M N D A B E D B A G 31 34 36 38 32” 815mm 34” 865mm 36” 915mm 38” 965mm 32 7/8” 35” 40 3/8” 44 1/2” 835mm 890mm 1025mm 1130mm C 5 1/8” 5 1/8” 5 1/8” 5 1/8” 130mm 130mm 130mm 130mm D 7 7/8” 6 7/8” 12 3/8” 11 3/4” 200mm 175mm 315mm 300mm 36 1/8” 39 1/4” 46 3/4” 51 7/8” E 918mm 996mm 1187mm 1318mm BREEZE 31/34/36/38 Dimensions variations A C 26 B D E ± 1/8 “ (3mm) C ± 1/4 “ (6mm)
CONTENU DE L’EMBALLAGE # Pièce Description Qty Code A Montant mural 2 99STR1043-AC B Panneau fixe 1 99SG10018-AC C Rail d’aluminium 2 99STR1033-AC (31) 99STR1034-AC (34) 99STR1035-AC (36) 99STR1036-AC (38) D Joint d’étanchéité (court) 1 99SRU0057-AC N Joint d’étanchéité (long) 1 99SRU0058-AC E Porte de douche 1 99SG00021-AC F Joint d’étanchéité magnétique de la porte 1 99SRU0059-AC G Extrusion pour la porte 1 99STR1037-AC H Joints pour panneau fixe 2 99SRU0060-AC I*
CONTENU DE LA QUINCAILLERIE AA BB CC DD Vis ST4×45 Vis ST3.5×25 Ancrage mural ø6×30 Vis ST4×14 Qty.12+2 Qty.8+1 Qty.8 Qty.2+1 EE FF GG HH Vis ST4×12 Vis ST4×13 Butée pour porte Capuchon pour vis Qty.2+1 Qty.6+1 Qty.2 Qty.14 II JJ Bague Vis M4×16 Qty.14 KK Qty.9 LL Qty.18 MM Vis ST4×12 Qty.6 Qty.
OUTILS REQUIS Perceuse Silicone Maillet en caoutchouc Niveau Crayon Truelle Fourrures 1x3 Tournevis Forets 3/16” 29 Rubant à mesurer Exacto Clés Allen
CETTE DOUCHE EST RÉVERSIBLE • Utilisez ces instructions pour une ouverture de la porte de droite à gauche (illustration A). • Pour une installation de gauche à droite (illustration B, suivez ces mêmes instructions mais permutez l’emplacement des panneaux: effet miroir.
PRÉPARATION ! Survole de l’installation de la base Montant mural Mur d’acrylique Placoplâtre Fourrures Bride Silicone Base de douche INSTALLATION DE LA BASE 1.
PREPARATION (OPTIONNELLE) Retirer la pellicule de plastique Vue du haut SILICONE PREPARATION DU MUR (OPTIONNELLE) 2.
PREPARATION DU MUR (OPTIONNELLE) 2.2 LL Vue du haut 9X SILICONE JJ KK 2.3 S’assurer de bien mettre les murs à niveau afin d’obtenir un interstice constant tout au long de la jonction entre le mur et la base.
PREPARATION DU MUR (OPTIONNELLE) 2.
PREPARATION DU MUR (OPTIONNELLE) 2.5 2.6 Adhésif de construction if s é h d A 22X f hé si Ad sive he Ad NAIL A d h e s iv e Étape optionnelle 2.7 Important Appliquez du silicone au dessus des murs d’acrylique. MM 6X AVERTISSEMENT! S’assurer d’appliquer une bonne pression sur la surface des murs d’acrylique là où la colle a été appliquée.
ASSEMBLAGE DU CHÂSSIS 3.1 C BB H 8X B G H C ASSEMBLAGE DU CHÂSSIS (CONT.) 3.
ASSEMBLAGE DU CHÂSSIS (CONT.) 3.3 D GG 2X EE POSITIONNEMENT DU CHÂSSIS 4.
POSITIONNEMENT DU CHÂSSIS (CONT.) 4.2 POSITIONNEMENT DU CHÂSSIS (CONT.) 4.3 4.
POSITIONNEMENT DU CHÂSSIS (CONT.) 4.5 8X *Only for ceramic wall 4.
POSITIONNEMENT DU CHÂSSIS (CONT.) 4.7 8X 5.
INSTALLATION DE LA PORTE 5.
INSTALLATION DE LA PORTE (CONT.) 5.
CALFEUTRAGE 24 H ATTENTION! Le silicone doit être appliqué à l’extérieur de la douche seulement afin de prévenir les fuites.
OVE Decors ULC Garantie LIMITÉE du produit OVE est distributeur des produits suivants: • Portes de douche (garantie de cinq ans). • Surfaces en acrylique (garantie de cinq ans contre le cloquage, le craquelage ou l’écaillage de la surface en acrylique). • Structure en acrylique de la coque (garantie de 5 ans contre les fuites d’eau à travers le stratifié en fibre de verre de la coque en acrylique).