Stampede 37.5 Inch Charcoal Grill Owner’s Manual Assembly and Operating Instructions Model # CG2053904-RG Tools required for assembly: (Not Included) Pliers, Philips & Flathead Screwdrivers, Adjustable Wrench. Keep this manual for future reference.
! ! WARNING l Only use this grill on a hard, level, non-combustible, stable surface (concrete, ground, etc.) capable of supporting the weight of the grill. Never use on wooden or other surfaces that could burn. l When grill is in use, keep clearance of 36” between the hot grill and any combustible materials, such as bushes, trees, wooden decks, wooden fences, buildings, etc. Do not place hot grill under roof overhang or in any other enclosed area. l The maximum weight of charcoal to be used is 3.
l ! ! WARNING When grilling, grease from meat may drip into the charcoal and cause a grease fire. If this should happen close lid to suffocate the flame. Do not use water to extinguish grease fires. l Use caution when opening the lid, keep hands, face and body a safe distance away. Flash flare ups may occur when air comes into contact with fire or hot coals. l Never place more than 5 pounds (2.3 kg) on front and side tables. l Do not allow charcoal and/or wood to rest on the walls of grill.
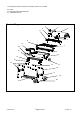
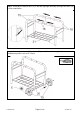
The following tools are required for assembly and are not included: l Pliers l Philips & Flathead Screwdrivers l Adjustable Wrench Product Diagram 3 2 5 1 6 4 8 10 7 23 12 9 11 13 14 15 22 16 18 17 19 20 21 CG2053904-RG Page 4 of 22 20150821-V0
Component List 1. Lid 2. Smoke Stack Qty. 1pc 5. Temperature Gauge 3. Damper Qty. 1pc 6. Warming Rack 4. Lid Handle Qty. 1pc 7. Cooking Grid Qty. 1pc 8. Charcoal tray hanger Qty. 1pc 9. Charcoal tray Qty.1pc 10. Side Shelf Qty. 1pc 13. Front Shelf Bracket 14. Front Shelf Support 18. Right Leg 21.Bottom Rack Qty. 1pc 12. Front Shelf Slat 15. Left Leg Qty. 2pcs 16. Legs Connector Qty. 2pcs 19. Wheel Qty.2pcs 22. Air Vent Qty. 2pcs Qty. 1pc Qty.2pcs Qty. 2pcs CG2053904-RG 11.
STOP! DO NOT RETURN TO RETAILER For assembly assistance, missing or damaged parts, please contact customer service at, customerservice@rankam.com or 888-837-1380 (U.S. only) Mon to Fri, 8:00 a.m. – 5:00 p.m. Pacific Standard Time.
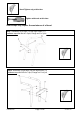
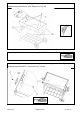
Hand Tighten only at this time Tighten with tools at this time Some steps may require the assistance of a friend. Step 1. Assembly of left legs (15) with legs holder (17) Hardware required: Bolt A x 4 pcs, Flange nut D x 4 pcs Step 2.
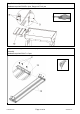
Step 3. Assembly the bottom rack (21) to left and right legs assembly and legs connector (16) to form a cart frame. Step 4. Assembly of wheels (19) and axle (20) to cart flame to form a grill cart.
Step 5. Assembly fire bowl (11) to grill cart Hardware required: Bolt A x 4pcs, flange nut D x 4 pcs Step 6. Tighten the bolts and nuts in steps 1,2 and 5. Step7. Assembly air vent (22) to fire bowl. Adjust to suitable tightness for turning.
Step 8. Assembly side shelf 10 to fire bowl (11). Hardware required: Bolt B x 4pcs, flange nut D x 4 pcs Step 9. Assembly front table slats (12) with front table bracket (13) to form front shelf assembly.
Step 10. Assembly front shelf assembly to fire bowl(11) Hardware required: Bolt C x 2 pcs, flange nut D x 2 pcs Step 11.
Step 12. Tighten the bolts and nuts in steps 9, 10 and 11. Step 13. Assembly the temperature gauge (5) to lid (1). Then assembly smoke stack (2) to the lid (1) and finally assembly the damper (3).. Hardware required: Bolt C x 2 pcs, Flange nut D x 2 pcs, Cap nut G and spring H x 1 pc each. Step 14.
Step 15. Assembly lid to fire bowl. Hardware required: Hinge Pin K x 2 pcs, cotter pin J x 2 pcs J K Step 16.
Step 17. Install warming rack (6) to grill lid and fire bowl. Hardware required: Cotter pin (J) x 2 pcs Step 18. Install cooking grid (7) to fire bowl. Also install the grease cup holder (23) to fire bowl underneath.
Final assembly ! WARNING ! WARNING ! Place the grill outdoors on a hard, level, non-combustible surface away from roof overhang or any combustible material. Never use on wooden or other surfaces that could burn. Place the grill away from open windows or doors to prevent smoke from entering your house. In windy weather, place the grill in an outdoor area that is protected from the wind. ! Read all safety warnings and instructions carefully before operating your grill.
Step 1 Lightly coat all interior surfaces of the grill with vegetable oil or vegetable oil spray. Do not coat charcoal grates or racks. Step 2 Follow the instructions below carefully to build a fire. You many use charcoal and/or wood as fuel in the grill (see “Adding Charcoal/Wood During Cooking” section of this manual). If using a Charcoal Chimney Starter, follow all manufacturer’s warnings and instructions regarding the use of their product. Start with 3.5 pounds (1.59 kg) of charcoal.
NOTE: It is important that the exterior of the grill is not scraped or rubbed during the curing process. IMPORTANT: to protect your smoker from excessive rust, the unit must be cured periodically and covered at all times when not in use. OPERATING INSTRUCTIONS Step 1 Lightly coat all interior surfaces of the grill with vegetable oil or vegetable oil spray. Do not coat charcoal grate or racks. Step 2 Follow the instructions below carefully to build a fire.
! ! WARNING Charcoal lighting fluid must be allowed to completely burn off prior to closing grill lid (approximately 20 minutes).Failure to do this could trap fumes from charcoal lighting fluid in grill and may result in a flash-fire or explosion when lid is opened. Step 5 Place cooking grates on grill support lips. ! ! WARNING Always wear oven mitts/gloves when adjusting cooking levels to protect your hands from burns. Step 6 Place food on cooking grates and close grill lid.
Adding Charcoal/Wood During Cooking Additional charcoal and/or wood may be required to maintain or increase cooking temperature. Step 1 Stand back and carefully open grill lid. Use caution since flames can flare-up when fresh air suddenly comes in contact with fire. Step 2 Wearing oven mitts/gloves, lift up the cooking grates and place it on a clean and non-combustible surface. DO NOT touch the grates by hand.
Proper Care & Maintenance l l l l l l Cure your grill periodically throughout the year to protect against excessive rust. To protect your grill from excessive rust, the unit must be properly cured and covered at all times when not in use. Wash cooking grates and charcoal grates with hot, soapy water, rinse well and dry. Lightly coat grates with vegetable oil or vegetable oil spray. Clean inside and outside of grill by wiping off with a damp cloth.
LIMITED WARRANTY 1. Manufacturer warrants this Product to be free from defects in workmanship and materials for a period of Ninety (90) days from the date of purchase, PROVIDED claims are submitted, in writing, with proof of purchase. 2.
Should you encounter any problem, or Obtain replacement parts CALL US FIRST. Do not return product to the store. WE CAN HELP. Rankam Metal Products Manufactory Ltd 1618 W. Rosecrans Ave., Gardena, CA90249, USA Please contact Customer Service at: customerservice@rankam.com or at 1-888-837-1380, Hours of Operation: Mon to Fri, 8:00 a.m. – 5:00 p.m. Pacific Standard Time.