
Full Product Manual

Covossi Solid Surface
Installation Instructions
• Safety glasses
• Dust mask
• Circular saw with thick heavy duty carbide
tipped blade
• Router with carbide tipped straight cutting
bit
• Orbital sander with 220 grit and 400 grit
sand paper
• Jigsaw with standard wood blade
• Drill
• Hot glue gun
• Vacuum
• Cutting Guide
• Measuring Tape
• C-Clamps
• Putty knife
• Hammer
• Wooden blocks
• Screw driver
• Screws
• Shims
• Masking tape
• Silicone Adhesive
• Covossi Solid Surface Adhesive and Filler
• Covossi Two-Part Adhesive Gun
• Heat reflective foil tape (if installing a drop-in
cook top)
Tools Required
INSTALLATION PROCEDURE
Step 1: Inspection and Preparation
a. Unpack the countertops and inspect them for any
damage. Make sure the base cabinets are level and
secured to the wall. If installing countertops on an island,
make sure the cabinets are structurally sound and can
support the weight of the countertop.
b. Ensure that the top edges of the cabinets are free from
debris such as glue, caulk, nails, and screws.
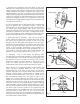
c. If you are installing the countertops with
a seam in a
corner, make sure there is bracing on the wall in the corner
at the same height as the top of the cabinets, if there is no
corner cabinet present. (See Fig. 1.)
Countertop Brace
Fig. 1
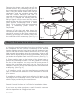
Step 2: Installation: cutting to size and making a seam
Covossi does not recommend making cuts free hand. You must use a guide to
ensure a straight cut.