
Full Product Manual

a. Measure the distance from the edge of the base
cabinet to the longest point of the corner of the planned
seam including any desired overhang and circular saw
offset (distance from edge of blade to the edge of the
saw base/guide. See Fig. 2.) Measure from the finished
edge of the Covossi countertop at the back and make a
mark for the length on the back edge of the countertop
including overhang. Mark a line completel
y across the
countertop at the appropriate angle from the back of the
countertop to the front.
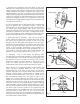
b. Place masking tape on the bottom of the circular saw
base to protect the countertop surface. Using the
circular saw, cut all the way through the countertop with
the saw’s base plate against your guide. (You may
need an extra person to hold the off-cut portion of the
countertop.) Make sure the edge is straight
and clean.
If you are creating a seam repeat the same measuring
and cutting steps above for the adjacent countertop.
c. End cap install (if needed) - After the cut to size is
made, make sure the edge is straight and clean. Using
the router and a guide, cut a notch in the end of the
wooden core to the depth and height of the end cap.
Apply the Covossi adhesive and filler to the dull side of
the end cap and one edge.
Insert the end cap into the
notch in the wooden countertop using clamps, or
secure tightly with tape then follow instruction 2b. You
may need to ease the edges of the end cap with the
sander to remove any sharp areas. (See Fig. 3.)
d. Seaming - Dry fit the seam by placing both
countertops onto the base cabinets to ensure the seam
is tight and flush. If the seam has any large gaps, use
the sander on the cut edge to remove any exce
ss
material to make the seam tighter. If the seam is not
flush, use shims on the top of the cabinet base to
ensure both sides of the countertop seam are level.
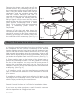
Once the dry fit is complete and the seam is tight and
flush, hot glue wooden blocks to the top of the
countertops on each side of the seam at the front,
middle, and back of the seam. Make sure the distance
between the blocks are close enough
to clamp on the
outside of each wood block. (See Fig. 4.) Slide one of
the countertops away from the seam to open it up.
Apply the Covossi adhesive and filler evenly to both
edges of the countertop making sure there is enough to
extrude out and fill any voids when the countertop is
clamped. Push the countertops back together making
sure the seam is tight, and the countertops are in their
correct final position
. Place the clamps on either side of
the blocks that were hot glued to the countertop and
gradually tighten the clamps from the front to the back
until the seam is tight. (See Fig. 4.) Let the Covossi
adhesive and filler cure until completely hardened. The
curing process can take up to 90 minutes depending on
the temperature and humidity.
1
2
3
4
5
6
7
Fig. 2
Baseplate
Masking tape
Covossi
adhesive and filler
Covossi two-part
adhesive gun
Wooden blocks
Fig. 3
Fig. 4
C-clamp