
Full Product Manual
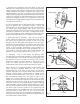

Remove the clamps, and gently tap off the
wooden blocks. Any remaining hot glue on
the countertops can be removed with a putty
knife. Using the orbital sander with 220-grit
sandpaper, sand the complete seam area
until the excess adhesive and filler is
removed and the seam is flush and smooth.
(See Fig. 5.) Repeat the sanding with the
400-grit paper until the area has the same
sheen as the rest of the countertop
. Covossi
Solid Surface Countertops have a matte
finish. For a glossier finish we recommend
using
a countertop polish similar to
Rejuvenate.
Vacuum off the dust and wipe down the
countertops with a damp rag. The countertop
should be secured to the base cabinets by
screwing up through the cabinet frame into
the underside of the countertop. (See Fig. 6.)
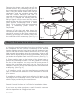
a. Using the supplied templates from the manufacturer, place
the templates on the Covossi countertop in the desired
location making sure the front, back, and side clearances are
correct and that no base cabinet structures are in the way.
Mark around the template onto the countertop. Using a drill
with a drill bit slightly larger than the jigsaw blade, drill a hole
just inside the template mark in all four corners. (See Fig. 7.)
b. Place masking tape on the bottom of the jigsaw base to
protect the countertop surface. Use the jigsaw to cut along
the line of the template. You may need an extra person to
support the countertop area being cut out. Once the cut is
complete, vacuum off any dust and wipe the area down with
a damp rag. (See Fig. 8.)
c. If installing a sink, use the manufacturer provided sink
clips, or clear silicone adhesive on the underside of the sink
lip to secure.
If installing a cooktop, place heat reflective foil tape on the
raw edge of the countertop cut-out, and secure the cooktop
with the clips provided by the manufacturer.
Search Covossi Surface on YouTube for installation videos.
If you have any other questions, e-mail Covossi’s customer
service department at: info@covossi.com.
Rev. June 2017
Orbital sander
Fig. 5
Screw
Fig. 6
Step 3: Cut outs for a sink or cooktop
Pilot hole
(4 corners)
Template
mark
Drill
Template
mark
Jigsaw
Fig. 7
Fig. 8