
Instructions / Assembly


Due to the wide range of surfaces, fasteners are not pro-
vided.
For masonry applications, 3/8” Hex Head Lag Bolts with
3/8” washers and proper anchors/shields are common to
mount the jambs. Other anchoring systems may be suit-
able. Follow manufacturers instructions.
If the walls/posts are not plumb, you can shim the jambs as
needed during installation to remedy.
Use one (1) bolt and anchor system for every 20” - 24” of
jamb height.
JAMB INSTALLATION
Install jambs before gate and hinges are installed.
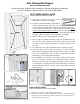
1) Place gate in opening using spacers at sides and bottom to
achieve necessary gaps.
2) Cut jamb to necessary length and determine position on
wall/post. Mark bolt locations: bolts should be 4-6” from top
and bottom edges. Remaining bolts should be evenly
spaced between. Adjust bolt location if necessary to allow
for proper hinge placement. If your jambs were pre-
mortised for you, be sure you are installing the correct jamb
on the correct side of the opening. Refer to your design
documents if applicable.
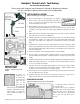
3) At each marked bolt location, counter bore for bolt head to
a minimum depth of 5/16”. Required depth may be greater.
4) At center of each drilled location, using necessary diameter
drill bit for shaft of bolt, drill through remaining jamb thick-
ness.
5) Position jambs against wall/post and using jambs as a tem-
plate, mark each hole location on the wall/post. Remove
jamb. At each marked location, drill hole in wall according
to anchor type and size (marked on anchor or anchor pack-
aging). Bolt depth into wall/post should typically be at least
1-1/2”
6) Insert anchors in wall/post. Position jamb against wall,
aligning holes in jamb with holes in wall.
7) Screw each hex head bolt through washer and jamb and
into anchors. Use socket wrench to tighten. Do not over
tighten.
Jambs
INSTALLATION INSTRUCTIONS
Please review ALL diagrams and instructions in full prior to beginning installation.
H:\Design\Installation Instructions\Jamb Installation Instructions RevB