
Instructions / Assembly


BUTT HINGE INSTALLATION
Install hinges before latching is installed.
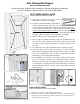
1) Place gate in opening using spacers at sides
and bottom to achieve necessary gaps.
2) If using self-closing butt hinges, install with ad-
justment keyhole facing up (located on one end
of each hinge barrel). The hinges will be positioned along edge of gate,
evenly spaced, keeping about 4-8” from top and bottom of gate. Hinges
must be vertically aligned with one another. If you have pre-mortised butt
hinges, the hinge locations on the gate and / or jamb will already be de-
termined. Follow the remainder of the instructions accordingly.
3) Mark each hinge location on post/jamb with a pencil.
4) Remove gate and, holding each hinge in place on post/jamb where the
first mark was made, mark each hole location with a pencil. Pre-drill
each marked hole location. Mount hinge to post/jamb using fasteners
provided.
5) Re-position gate as in step 2 and mark location of each hinge on gate.
6) Re-position gate in open position, using spacers to hold off ground
proper distance. Align hinges with marked positions on gate edge. Mark
each hole location with a pencil. Pre-drill each marked hole location.
Mount hinges to gate using fasteners provided.
7) After installation, set each hinge at the lowest spring tension using the
tension hex wrench to slowly turn the adjustment keyhole clockwise.
When the hole on the side of the hinge barrel aligns, insert the small sil-
ver locking pin. Test spring tension. If needed, repeat process incremen-
tally until desired tension is achieved. Keep tension setting consistent
between hinges.
Spacers
Hinges
Do not mount
hinge plates
on face of
gate or front
of post/jamb.
Door in CLOSED position
1
-
1
/
4
”
Gate
Post/
Self-Closing Butt Hinges
INSTALLATION INSTRUCTIONS
Please review ALL diagrams and instructions in full prior to beginning installation.
Use this instruction in place of those inside of the hardware box.
STOP INSTALLATION
Failure to install gate stops will void warranties.
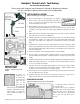
1) Cut stop to be at least as long as the gate’s edge height.
2) Mount stops to posts (or jambs, if applicable) using screws and/or weatherproof
wood glue (such as Titebond III). Position stop with 1/32” gap between face of
gate and stop when gate is closed.
H:\Design\Installation Instructions\Self Closing Butt Hinges RevB
Door in OPEN position