CODE Item #********** ********** ********** Model #DL10492BKS-4 DL10496BKS-4 DL10497BKS-4 USE AND CARE GUIDE LED LANDSCAPE LIGHT KIT Questions, problems, missing parts? Before returning to store, call Code Lighting Customer Service 9 a.m. - 4 p.m., EST, Monday - Friday 1-855-235-8715 www.homedepot.com THANK YOU We appreciate the trust and confidence you have placed in CODE through the purchase of this LED landscape light. We strive to continually create quality products designed to enhance your home.
Table of Contents Table of Contents ......................................2 Safety Information ....................................2 Warranty ...................................................3 Pre-Installation .....................................3 Tools Required....................................3 Hardware Included.....................................3 Package Contents .....................................4 Installation......................................... 5 Operation...............................
Warranty e date of purchase. If within this period the product is found to be defective in material or workmanship, the product must be returned, with a copy of the bill of sale as proof of purchase, to the original place of purchase. The manufacturer will, at its option, repair, replace, or refund the ue to consequential damages.
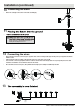
Pre-installation (continued) PACKAGE CONTENTS NOTE: Some fixture shapes may vary and are not shown for all models. However, the installation steps are the same.
Installation 1 Marking the installation hole □ Select a location near an outside 120-volt covered GFCI outlet cover plate marked for WET LOCATION. Using the mounting template (DD), mark holes for the power pack (F) at least 20 in. above ground level. 2 □ □ Installing the anchor Drill holes using a 1/4 in. drill bit (not included). Install plastic anchors (CC) and Phillips screws (AA), leaving enough space for the power pack (F). 3 4 20 in. (50.
Installation (continued) 6 □ Power pack installation AA Hang the power pack (F) on the Phillips screws (AA) using the keyhole slots on the back and bottom of the power pack (F). F AA 7 □ Installing the photo eye holder When selecting a location for the photocell cable (FF), make sure it will receive direct sunlight during the day. DO NOT mount the photocell cable system to shut off unexpectedly. Drill a hole using a 1/4 in.
Installation (continued) 10 □ Connecting the stake B Attach the stake (E) to the bottom of the tube assembly (B). E 11 □ CAUTION: DO NOT use a hammer. into the ground. For ground with hard soil, use a trowel (not included) to loosen soil. 12 □ □ □ □ Connecting the wires Detach and place the wire connector (D) on opposite sides of the low voltage cable (G) from the power pack (F) where the fixture will be located.
Operation Functional instruction □ □ □ □ □ After properly installing the power pack, turn on the power pack. There are four buttons for operation. Every time you press either button, it will turn to another working mode. Push either button repeatedly to move to the different selections. □ “AU” - ON AT DUSK OFF AT DAWN (lights turn on at dusk and turn off at dawn). □ “1” through “12” - ON AT DUSK RUN TIME (lights turn on at dusk and turn off after the selected number of hours).
Cable Selection 12 VOLT TAP Cable Length Total Fixture Wattage 0-50 feet 51-100 feet 101-150 feet 0-60 Watts 16 AWG 16 AWG 14 AWG 61-120 Watts 16 AWG 14 AWG 12 AWG 121-180 Watts 14 AWG 12 AWG NOT RECOMMENDED 181-240 Watts 14 AWG 12 AWG NOT RECOMMENDED 241-300 Watts 12 AWG NOT RECOMMENDED NOT RECOMMENDED 600W Transformer = (2X300) Watts 12 AWG NOT RECOMMENDED NOT RECOMMENDED 900W Transformer = (3X300) Watts 12 AWG NOT RECOMMENDED NOT RECOMMENDED 15 VOLT TAP Cable Length To
CODE Questions, problems, missing parts? Before returning to store, Questions, problems, missing parts? Before returning to store, call Code Lighting Customer Service 9 a.m. - 4 p.m., EST, Monday - Friday 1-855-235-8715 www.homedepot.com Retain this manual for future use.
CODE Artículo #********** ********** ********** Model #DL10492BKS-4 DL10496BKS-4 DL10497BKS-4 GUÍA DE USO Y MANTENIMIENTO KIT DE LUCES LED PARA JARDÍN ¿Preguntas, problemas o piezas faltantes? Antes de regresar a la tienda, llama al servicio al cliente de Code Lighting, de lunes a viernes de 9 a.m. a 4 p.m., hora estándar del Este 1-855-235-8715 www.homedepot.com GRACIAS POR TU COMPRA Apreciamos la confianza que has depositado en CODE al comprar esta lámpara de luz LED para jardín .
Índice Índice.................................................. 2 Información de Seguridad ....................................2 Garantía ...................................................3 Pre-Instalación ..................................................3 Herramientas Necesarias .......................................3 Herrajes Incluidos ............................................3 Contenido del paquete ..................................... 4 Instalación .............................................
Garantía El fabricante garantiza que esta lámpara estará libre de defectos en materiales y mano de obra por un periodo de tres años a partir de la fecha de su compra. Si durante este lapso, el producto resulta defectuoso en cuanto a material omano de obra, deberá devolverlo al lugar de la compra original, junto con una copia de la factura de venta comocomprobante de la compra. El fabricante, según su criterio, reparará, sustituirá o reembolsará el precio de la compra alcomprador o consumidor original.
Pre-Instalación (continuación) CONTENIDO DEL PAQUETE NOTA: Algunas formas de las lámparas pueden variar y no se muestran para todos los modelos. Sin embargo, los pasos de la instalación son los mismos.
Instalación 1 □ Seleccione una ubicación cercadel tomacorriente exterior de 120 voltios tipo GFCI cubierto con una placa con la inscripción "PARA LUGAR HÚMEDO". DD alimentación (F) por lo estar a 50,8 cm sobre el nivel del suelo. 2 □ □ Instalación de los anclajes F □ F Pela el cable de bajo voltaje 2 in. (50,8 mm) Para la conexión de cables de bajo voltaje, separe un extremo del cable de bajo voltaje (G) de aproximadamente 50,8 mm y pele aproximadamente 19 mm 3/4 in.
Instalación (continuación) 6 □ Instalación de la batería portátil Cuelgue el bloque de alimentación (F) en los tornillos Phillips (AA) mediante las ranuras en forma de cerradura ubicadas en la parte posterior del bloque de alimentación (F). AA F AA 7 □ □ □ 8 □ Cómo instalar el soporte del sensor fotoeléctrico Al seleccionar una ubicación para el cable de célula fotoeléctrica (FF), asegúrese de que recibirá luz solar directa durante el día.
Instalación (continuación) 10 □ B Une el estaca Fije el estaca (E) a la parte inferior del asamblea de tubo (B). E 11 □ Coloca la lámpara clavándola en tierra Empuje la lámpara ensamblada para enterrarla. PRECAUCIÓN: NO use un martillo. NUNCA entierre la lámpara en el suelo empujándola desde el cabezal.En lugar de ello, sostenga el poste y entierre la lámpara en el suelo. Para suelos con la tierra.
Funcionamiento Instrucciones de funcionamiento □ Después de la instalación correcta del bloque de alimentación, active la fuente eléctrica. Existen dos botones de operación. Cada vez que presione algún botón, cambiará a otro modo de funcionamiento. Presione cualquier botón repetidamente para realizar las diversas selecciones. □ “AU” : SE ENCIENDE AL ATARDECER Y SE APAGA AL AMANECER (las luces se encenderán al anochecer y se apagarán al amanecer).
Selección por Cable GRIFO 12 VOLTIOS Longitud del Cable Total Fixture Potencia 0-50 pies 51-100 pies 101-150 pies 0-60 Watts 16 AWG 16 AWG 14 AWG 61-120 Watts 16 AWG 14 AWG 12 AWG 121-180 Watts 14 AWG 12 AWG NOT RECOMMENDED 181-240 Watts 14 AWG 12 AWG NO RECOMENDADO 241-300 Watts 12 AWG NO RECOMENDADO NO RECOMENDADO 600W Transformador= (2X300) Watts 12 AWG NO RECOMENDADO NO RECOMENDADO 900W Transformador= (3X300) Watts 12 AWG NO RECOMENDADO NO RECOMENDADO GRIFO 15 VOLTIOS
CODE ¿Preguntas, problemas o piezas faltantes? Antes de regresar a la tienda, llama al servicio al cliente de Code Lighting, de lunes a viernes de 9 a.m. a 4 p.m., hora estándar del Este 1-855-235-8715 www.homedepot.com Conserva este manual para uso en el futuro.