
Instructions / Assembly

MOUNTING WITH SCREWS
1. Pre-drill screw holes before mounting.
2. Holes should be drilled at least 1/16" larger than the
screw diameter to allow for expansion and contraction.
3. Position drill holes as close to the center of the panel
border (space between edge and cut-out pattern) as
is practically possible.
4. Attach panels every 12" to 18" around the entire panel
border. Attaching all four sides will secure the panels
and help keep them straight. DO NOT overtighten screws
to avoid damaging the panel.
5. Where multiple sheets are being installed adjoining
each other (at side or top), leave a minimum space
of 1/16" between the panel edges, on all sides,
to allow for thermal expansion.
6. For an aesthetically pleasing eect, use painted
screws to match the panel color. LED light strips
can be added inside a frame behind the panel
for a backlit eect.
MOUNTING WITH ADHESIVE
Follow instructions #4 & #5 for installations with screws (above). We highly
recommended the use of screws in addition to adhesive.
INSTALLATION INSTRUCTIONS
10-YEAR LIMITED WARRANTY
DESIGN-VU panels are warranted against peeling, rotting, cracking, blistering, warping, and abnormal
discoloration/fading under normal atmosphere and weather conditions. This limited warranty does
not cover damage resulting from misuse, improper storage or handling, improper installation, or any
horizontal roong/ceiling applications.
PLEASE READ BEFORE YOU BEGIN:
We recommend following best building practices for installing these panels, in accordance with
their intended purpose. We warranty the material integrity of our product, but the installer assumes responsibility for the installation.
If in doubt, consult a professional. In some cases, building approval may be required for decorative or privacy panels. We recommend
checking with the proper authorities to determine if any building codes or standards apply to your project.
DESIGN-VU panels are designed for vertical mounting only, as in a wall or fence installation. Horizontal mounting, as in a roof or
ceiling position, is not recommended and is not covered by the 10-Year Limited Warranty.
Follow these instructions and recommendations for a professional
installation within warranty, and to avoid damaging the panel.
SCREWS:
(Mounting screws are not included
with DESIGN-VU panels.)
– Use screws with a diameter
of 1/8" or smaller.
– Use washers where
appropriate.
– Screws should be long
enough to penetrate a
minimum of 1" into the
structure behind the
panels.
– Deck screws or Phillips
wood screws are good
options.
– Use galvanized screws for
outdoor applications.
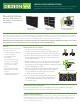
Mounting Options
Mounts to walls, fences and
at surfaces, and to timber or
metal frames.
1-¾”
1-¾”
2”
2”
48”x24” SERIES
SOLID 1-¾” NOMINAL BORDER
96”x48”mm SERIES
SOLID 2” NOMINAL BORDER
ALL PANELS NOMINAL
MATERIAL THICKNESS 3/8”
96”x48”
SERIES
48”x24”
1-¾”
1-¾”
2”
2”
48”x24” SERIES
SOLID 1-¾” NOMINAL BORDER
96”x48”mm SERIES
SOLID 2” NOMINAL BORDER
ALL PANELS NOMINAL
MATERIAL THICKNESS 3/8”
96”x48”
SERIES
48”x24”
1-¾”
1-¾”
2”
2”
48”x24” SERIES
SOLID 1-¾” NOMINAL BORDER
96”x48”mm SERIES
SOLID 2” NOMINAL BORDER
ALL PANELS NOMINAL
MATERIAL THICKNESS 3/8”
96”x48”
SERIES
48”x24”
PANEL BORDER
1-¾”
1-¾”
2”
2”
48”x24” SERIES
SOLID 1-¾” NOMINAL BORDER
96”x48”mm SERIES
SOLID 2” NOMINAL BORDER
ALL PANELS NOMINAL
MATERIAL THICKNESS 3/8”
96”x48”
SERIES
48”x24”
1/16" SPACE BETWEEN PANEL EDGES
Face-mounted
Construction
Window-framing
Construction
Panels can be mounted
in any orientation.