
Installation Guide

INSTALLATION GUIDE
MODELS:
EC14-2000e / EC14-2040e
EC18-2000e / EC18-2040e
©2017. Euri Lighting | A Division of IRTRONIX Inc. All Rights Reserved
For customer service please call us at 1-888-743-5766
Ofce Hours: 8:00 a.m. – 5:00 p.m. PST Monday-Friday
Questions?
FOR MORE INFORMATION PLEASE VISIT: WWW.EURILIGHTING.COM
Ceiling Light Series
LED Dome Class
PLEASE REVIEW THE INSTRUCTIONS AND WARNINGS LISTED BELOW PRIOR TO PROPER INSTALLATION
WARNINGS CAUTIONS
• Risk of electric shock – disconnect power at source before installation.
• Properly ground electrical enclosure.
• Risk of fire - follow all NEC and Local codes.
• Use only UL or IEC approved wire for input/output connections (minimum
size 18 AWG (0.75mm
2
).
• Do not install insulation within 3 inches (76mm) of luminaire top.
•Risk of injury - luminaire may fall if inner bezel is not secured properly to
outter bezel. Ensure that the whole loop is positioned and secured under
the washer.
• Do not look directly at the operating LED lamp.
• Do not touch this product with wet hands.
• Do not disassemble, repair or alter lamp.
• Designed for indoor applications only.
• Suitable for damp locations.
• The luminaires should be grounded.
• Avoid contact with lamp pins during installation.
• To prevent early lamp failure: Lamp should only be installed in
operating environments ranging between -20° C and +50° C .
• This Device is not intended for use with emergency exits or
emergency lights.
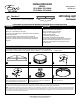
INSTALLATION INSTRUCTIONS
Before assembly, installation or operation, ensure all parts are present. Turn power off prior to starting installation.
Package includes: 1- Round Flushmount Housing with Diffuser installed, 3 - Wirenuts 2 - 11/2” Electrical Box Screws, 1 - Installation Manual.
To remove srcews twist counterclock wise. Remove cover. Insert Electrical Box screws into the junction box.
Connect the Live, Ground and Nuetral wires from the
xture to corresponding wires on the junction box. All
wire connection should be secured with wirecaps.
To install the xture plate, twist clockwise onto the
mounting screws. Once in place use a screwdrive to
secure mounting screws.
Install lamp cover and secure retaining bolts (twist
clockwise). Turn power on.
This device complies with Part 15 of the FCC Rules. Operation is subject to the the following two conditions: (1) This device may not cause harmful interference, and (2) this device must accept
any interference recieved, including interference that may cause undesired operation. This Class (A) RELD complies with the Canadian standard ICES-003.
NOTE: This equipment has been tested and found to comply with the limits of a Class A digital device, pursuant to Part 15 of the FCC Rules. These limit are design to provide reasonable protection
against harmful interference when the equipment is operated in a commerical environment. This equipment generates, uses, and radio frequency energy and if not installed and used in accordance
with the instruction manual, may cause harmful interference to radio communications. Operation of this equipmet in a residential area is likely to cause harmful interference in which case the user
will be required to correct the interference at their own expense.
LED Ceiling Light
Flushmount
1
4
2
5
3
6