
Installation Guide

When installing crown moulding, there are two methods that can be used to cut an inside
corner. You can simply miter 45 degree angles to achieve the appropriate cut or you can choose
to cope the inside corners. A coped cut requires cutting the back side of the moulding to match
the profile of the front side. The coped cut will butt up to the profiled front of the moulding
once installed. We’ll cover both methods.
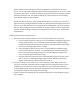
Always remember to place your crown moulding upside down on you miter saw. The bottom
edge of the crown, usually the edge with a small cove, will always be placed against the fence of
the saw. This is often referred to as cutting upside down and backwards. The crown moulding
will sit on the saw table just as if it were installed on the wall. However, it will be upside down
and your saw will be swung to the left to cut a right hand corner and vice versa. Upside down
and backwards!
Installing crown moulding using mitered cuts
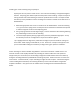
5. Cut your first piece to length. Be sure to cut it a little long to allow for your miter joint.
a. If you are beginning with an inside corner, cut the moulding at a 45 degree angle across
the face of the moulding. This cut will make the back side of the moulding that goes
along the wall longer than the face of the moulding. It will also make the bottom edge
of the crown moulding longer than the top edge.
b. If you are beginning with an outside corner, cut the moulding at a 45 degree angle
across the back side of the moulding. This will make the face of the moulding longer
than the back side that goes against the wall. It will also make the top edge of the
crown moulding longer than the bottom edge.
c. It may be necessary to splice two pieces of base moulding together if you have a long
wall. To do this, cut opposing 30 degree angles across the moulding. Splice them
together (preferably over a wall stud) and nail into place.
6. Once your finishing cuts are made, nail your crown moulding in place. Begin in the corner,
nailing into a wall stud at the bottom of the moulding and into a ceiling joist at the top of the
moulding. Use a stud finder to locate the studs before you nail. Using a level to keep your
crown moulding straight across the wall, finish installing the piece by nailing into the wall studs
and ceiling joists along the entire length of the moulding.
7. Continue with the next adjoining piece by making the appropriate cut and repeating until your
job is complete.