
Installation Guide


8
Warning: This appliance must be grounded!
Warning: The appliance must connect to a current protection circuit or
device at 50Amp or less before being connected to power supply!
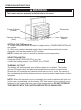
High temperatures – risk of re. Keep ammable materials, such as fur-
niture, pillows, bedding, papers, clothes and curtains at least 3 ft. (0.9 m)
from the front and top of the heater and keep them away from the sides
and rear. To reduce the risk of re, do not use it in areas where gasoline,
paint or ammable liquids are used or stored.
WARNING
WARNING
CAUTION
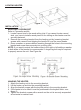
CONNECTING THE POWER
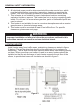
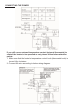
3. The external temperature control (external thermostat) should be in
accordance with the requirement of UL or ETL standard.
4. The lead wire of external temperature control (external thermostat) can not
less than 14AWG.
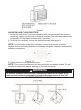
1. Remove the screw from the front of the unit to connect the power to the heater.
2. Attach the cable connectors to the unit (See Figure 6) and slide the 10-gauge
wire through the cable connector.
3. Connect the wire to the power block located in the base of the heater - See Figure 7.
4. Turn on the power at the main service.
NOTE: All wiring must be carried out by a Certied Electrician and must be in
accordance to national and local electrical codes in the United States. For certain
applications, conduit may be required, See Figure 6. Check local electrical codes.
If you run the wiring in conduit and wish to be able to turn the heater be sure to
purchase enough exible conduit to allow the heater to be turned.
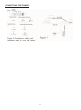
TO PROTECT THE HEATING ELEMENT
When start the heater, turning the temperature control in clockwise slowly to
terminal, the unit starts the fan rst then star the heating element.
When close the heater, turning the temperature control in anticlockwise slowly to
off, the unit close the heating element rst then close the fan.