
Manual


is device complies with part 15 of the FCC rules. Operation is subject to the
following two conditions:
(1) this device may not cause harmful interference, and (2) this device must accept
any interference received, including interference that my cause undesired operation.
FCC Note: e manufacturer is not responsible for any radio or TV interference
caused by unauthorized modications to this equipment. Such modications could
void the user’s authority to operate the equipment.
Note: is equipment has been tested and found to comply with the limits for
a Class B digital device, pursuant to Part 15 of the FCC Rules. ese limits are
designed to provide reasonable protection against harmful interference in a residential
installation. is equipment generates, uses and can radiate radio frequency energy
and, if not installed and used in accordance with the instructions, may cause
harmful interference to radio communications. However, there is no guarantee that
interference will not occur in a particular installation. If this equipment does harmful
interference to radio or television reception, which can be determined by turning the
equipment o and on, the user is encouraged to try to correct the interference by one
or more of the following measures:
• Reorient or relocate the receiving antenna.
• Increase the separation between the equipment and receiver.
• Connect the equipment into an outlet on a circuit dierent from that to which
the receiver is connected.
• Consult the dealer or an experienced radio/TV technician for help.
e user may nd the following booklet prepared by the Federal Communications
Commission helpful:
“How To Identify and Resolve Radio-TV Interference Problems.” is booklet is
available from the U.S. Government Printing Oce, Washington, DC 20402, stock
# 004-000-00345-4.
is Class B digital apparatus complies with Canadian ICES-003. International: is
is a CISPR 22 Class B product.
©2014 e Toro Company, Irrigation Division Technical Support: 1-877-345-8676 Form Number 373-0809 Rev. B
8. If it does match, press .
If it does not match, change to NO, press , and repeat steps
3-8.
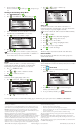
Getting to the Auxiliary Relay Menu
1. Press ADVANCED then .
2. Press to SCHEDULE DETAILS then press .
3. AUX 2 and AUX 3 are the schedules to control the
EVO-AR relays (for AUXILIARY, see note below).
4. Press to move to the schedule to adjust.
5. Press or to enter the selected AUX menu.
AUXILIARY allows the controller to control a wired device
such as a wired relay pump or fountain. AUX 2 and AUX 3
are for wireless devices connected to an EVO-AR.
The AUX Menu
Status
Enable or disable the AUX 2 or 3 schedule without having to
actually delete the schedule. For example, one might disable
backyard lights and/or fountain while one is on vacation.
1. Press to ENABLED eld.
2. Press or to enable or disable the schedule.
3. Press to commit the selection.
Active Days
Set the days that the AUX schedule will be active.
1. Press to ACTIVE DAYS. Press or .
2. Press or to move from day to day.
3. Press or to enable or disable a day.
(A is an “enabled” day.)
4. Press to commit the changes.
Start / End
Set the start and end times of the AUX 2/3 schedule. For a
residential transformer controlling lights, a start time and end time
of 7pm and 11pm (respectively) might be desirable.
To turn the schedule o, “OFF” is between 11AM and 12AM.)
1. Press to START.
2. Press or . e hour eld will be highlighted.
3. Press or to change the hour value.
4. Press to move to the next eld.
5. Press or to change the highlighted value.
6. Repeat steps 4 and 5 to adjust AM/PM.
7. Press to commit the changes.
ID
is eld is display-only and shows the ID of the AUX device.
Erase Schedule
Erase the schedule of the AUX device. You will be prompted to
corm schedule deletion.
Manual Operation
It is possible to manually begin the AUX2 or AUX3 schedule from
the EVOLUTION® controller. e Auxiliary Relay must be enabled
and scheduled.
1. Press WATER NOW.
2. Press to select the enabled auxiliary schedule:
AUX 2 or AUX 3.
Press . e auxiliary system will turn on.
3. At the HOME screen, press to review how long the
auxiliary sytem will be active.
4. To stop an auxiliary schedule, press WATER OFF.
ZONE RUNTIMES
ZONE DETAILS
SCHEDULE STARTS
SENSORS
ADVANCED
→
SCHEDULE DETAILS
SCHEDULE A
SCHEDULE B
SCHEDULE C
AUXILIARY
SCHEDULE DETAILS
AUX 2
→
STATUS ENABLED
START 07:00PM
RUNTIME 00:05
ID 01 36 06
AUX 2
ACTIVE DAYS
→
S M T W T F S
- -
TODAY IS MONDAY
SCHEDULE
-
SCHEDULE A
ZONES
ALL ZONE TEST 02:00
WATER NOW
AUX 2
→
For more information about the EVO-AR, including support information, please point your browser to www.toro.com/evolution.
FCC Notice