
Manual

7
Setup Screen
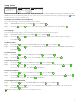
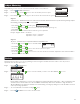
WELCOME
INITIALIZING
PLEASE WAIT . . .
SETUP
REGION US/CAN
LANGUAGE ENGLISH
DATE FORMAT MM/DD/YY
CLOCK 12 HOUR
TIME 12:01AM
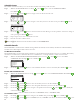
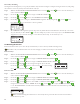
SETUP
DATE 01/01/13
BEGIN WEEK SUNDAY
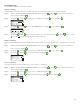
Upon power up, the initialization screen will display briey. On initial power up, the EVOLUTION® will display the SETUP screen. is
SETUP screen is only accessed during initial power up or after a factory reset is performed. Once Setup is completed, press the HOME
button at any time to return to the main screen.
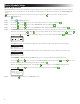
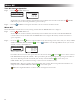
Set Region (For Firmware 2.13 and Newer)
Select your location Region. Select from US/CAN, Australia or Europe.
Step 1 – While REGION is selected, press the Right
arrow or SELECT .
Step 2 – Use the Up or Down arrows to select from US/CAN (default), Australia or Europe. Press SELECT .
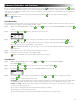
Set Language
Select the preferred display language. Select from English, Spanish, French, German, Italian or Portuguese.
Step 1 – While LANGUAGE is selected, press the Right
arrow or SELECT .
Step 2 – Use the Up
or Down arrows to select from English (default), Spanish, French, German, Italian or Portuguese.
Press SELECT .
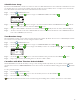
Set Date Format
Step 1 – Use the Down arrow to select DATE FORMAT. Press the Right arrow or SELECT .
Step 2 – Use the Up or Down arrows to select MM/DD/YY (Month/Day/Year) (default) or DD/MM/YY (Day/Month/Year).
Press SELECT .
Set Clock Format
Step 1 – Use the Down arrow to select CLOCK. Press the Right arrow or SELECT .
Step 2 – Use the Up or Down arrows to select 12 HOUR (default) or 24 HOUR. Press SELECT .
Set the Current Time
Step 1 – Use the Down arrow to select TIME. Press the Right arrow or SELECT .
Step 2 – Use the Left or Right arrows to navigate between the Hour and Minute positions. Use the Up or Down
arrows to set the correct values. Press SELECT when nished.
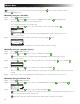
Set the Current Date
Step 1 – Use the Down
arrow to select DATE. Press the Right arrow or SELECT .
Step 2 – Use the Left or Right arrows to navigate between the Month, Day and Year positions. Use the Up or Down
arrows to set the correct values. Press SELECT when nished.
Set the Beginning of the Week
Step 1 – Use the Down arrow to select BEGIN WEEK. Press the Right arrow or SELECT .
Step 2 – Use the Up or Down arrows to select SUNDAY (default) or MONDAY as the beginning of the weekly schedule.
Press SELECT when nished.
Note: For additional Setup options, refer to the Help/Setup section.