
Manual


• RF reception range:
externally mounted: 1000’ (305
m) LOS (line of sight)
inside a metal transformer
cabinet: 500’ (152 m) LOS
• Operating temperature range:
14° – 140° F ( -10°– 60°C)
• Warranty: Five years
status lights
Setup button
3-prong outlet
plug into transformer
unique ID number
e EVO-AR works with any residential transformer with an internal AC outlet. One can also plug the AR unit directly into a wall
outlet and then plug an electronic device into the AR’s own outlet, such as holiday lights or a fountain.
1 2 3
LISTED
FCC-ID: OF7LPCU
IC: 3575A-LPCU
!
WARNING: Disconnect power to transformer before installing EVO-AR.
EVOLUTION
®
Series Add-On:
EVO-AR Auxiliary Relay
EVOLUTION
®
Series Add-On:
EVO-AR Auxiliary Relay
Auxiliary Relay Overview Specifications
EVO-AR Installation
Smart Connect
™
Installation
EVOLUTION Menu Navigation
1. Use or to navigate the menu commands.
2. Press or to move to the desired eld.
3. Press and to adjust the value.
4. Press SELECT to input the desired value.
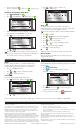
Adding the Auxiliary Relay
1. Note the unique ID number on the back
of the device. Plug back into transformer
when done.
2. Press then .
3. Press to ADD/REMOVE
DEVICE. Press .
4. Press to AUX 2 or AUX 3. Press or to ADD.
5. e EVOLUTION controller prompts the user to press the
button on the AR to link the devices immediately.
6. Press the Setup button on the Auxiliary Relay unit.
7. e controller will detect the AR. Conrm that the device ID
detected matches the AR ID.
ZONE DETAILS
SCHEDULE STARTS
SCHEDULE DETAILS
SENSORS
ADVANCED
→
ADD/REMOVE DEVICE
→
WS ADD
SOIL 1 ADD
SOIL 2 ADD
SOIL 3 ADD
AUX 2
ADD/REMOVE DEVICE
→
ADD
PRESS BUTTON ON AR
ADD/REMOVE DEVICE
CANCEL
AUX 2
DEVICE ID 01 36 06
CORRECT?
ADD/REMOVE DEVICE
YES
Controlling the Auxiliary Relay from the EVOLUTION Controller
1 2 3 4
DO NOT CUT ANTENNA