
Manual


19
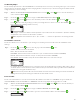
Set Active Days
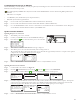
Step 1 – Use the Up
or Down arrows to select the Auxiliary Schedule you want to edit, then press SELECT .
Step 2 – Use the Up or Down arrows to navigate to the ACTIVE DAYS, then press the Right arrow or SELECT .
ACTIVE DAYS
S M T W T F S
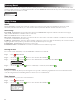
Step 3 – Use the Left or Right arrows to navigate within the days of the week. Use the Up or Down arrows to activate
or turn o the day for watering. Repeat for all days of the week.
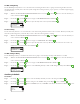
ACTIVE DAYS
S M T W T F S
Step 4 – Press SELECT when nished.
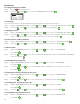
Set Start Time
Step 1 – Use the Up or Down arrows to select the Auxiliary Schedule you want to edit, then press SELECT .
Step 2 – Use the Up or Down arrows to navigate to START, then press the Right arrow or SELECT .
Step 3 – Use the Up or Down arrows to enter the desired start time while using the Left or Right arrows navigate
between hours and minutes.
Step 4 – Press SELECT when nished.
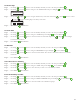
Set Runtime
Step 1 – Use the Up or Down arrows to select the Auxiliary Schedule you want to edit, then press SELECT .
Step 2 – Use the Up or Down arrows to navigate to RUNTIME, then press the Right arrow or SELECT .
Step 3 – Use the Up or Down arrows to enter the desired runtime. You can enter a maximum of 12 hours in 1-minute
increments.
Step 4 – Press SELECT when nished.
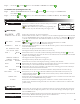
Select the Zone for Auxiliary
Step 1 – Use the Up or Down arrows to select the Auxiliary Schedule you want to edit, then press SELECT .
Step 2 – Use the Up or Down arrows to navigate to ZONE, then press the Right arrow or SELECT .
Step 3 – Use the Up or Down arrows to select the Zone you want to use as the auxiliary terminal.
Step 4 – Press SELECT when nished.
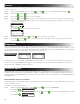
Erase the Auxiliary Schedule
Step 1 – Use the Up or Down arrows to select the Auxiliary Schedule you want to edit, then press SELECT .
Step 2 – Use the Up or Down arrows to navigate to ERASE SCHEDULE, then press the Right arrow or SELECT .
Step 3 – Use the Up or Down arrows to select NO or YES at the conrmation prompt.
Step 4 – Press SELECT when nished.