
Instructions / Assembly


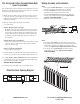


MID SUPPORT STABILIZER
(INSTALLATION IS OPTIONAL for section under 8')
Note: Assemble with 1 1/2" fasteners included with pickets.
1. Pre-drill pilot holes to attach Bottom Rail Snap on the top of the Mid
Support creating a “T” conguration as shown.
2. Fasten Bottom Rail Snap to Mid Support using 1 1/2" picket fasteners.
3. Once your railing is installed, place Mid Support at center of rail. If
necessary, measure from ground to bottom rail and cut the Mid Support
proper height.
4. Snap the horizontal section of the Mid Support to the bottom rail of your
railing section. Note: Upward pressure must be applied to your railing
section in order to slide and snap the Mid Support Stabilizer in place.
11
For assistance call Madden Manufacturing
573-365-7085
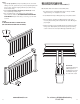
STEP 3:
1. Align the top cap (E) with your top snap making sure one end is flush.
Starting at one end, squeeze the top cap and top snap (D) together until
it pops in place. Continue snapping down the top cap until reaching
the end of your railing.
2. Slide the top post mounts (F) and bottom post mounts (G) over the
ends of your railing (4 mounts total).
3. Place assembled railing section between posts. If the handrail
section need to be shortened, CUT EQUAL LENGTHS FROM BOTH ENDS
OF THE RAILING. Example: If the railing is 3" too long, cut 1 1/2" from
each end.
STEP 3B
IS ONLY NECESSARY WITH 8 FT RAILING SECTIONS
(MID SUPPORT NOT INCLUDED WITH 6 FT RAILINGS)
10
www.maddenmetals.com
Quick Install:
Fasten Bottom Rail Snap
to Mid Support in "T"
Configuration and install
under bottom railing at
the center of the section